• Singapore Shrimp Satay (Satay Udang)

    Singapore Shrimp Satay (Satay Udang)

    Singapore Shrimp Satay (Satay Udang)

    It may be “Labor” Day weekend, but when summer is coming to a close the last thing we want to do is heavy work in the kitchen. Nope, we want quick, easy and tasty dishes for the grill. We want to maximize our outside time with friends, eat good food and perhaps enjoy a few tasty beverages (and whine that real live starts again). But what if we want to go beyond the standard burgers and hot dogs? Enter satay, the Southeast Asian staple of some kind of protein on a stick cooked over a hot fire. Meat..Stick.. Fire….Yumm….More????

    satay

    Mix one of these before you get started.

    Mix one of these before you get started.

    We aren’t sure were we first tried this dish, also called Satay Udang, but it was one of those dishes were we immediately said, “we gotta make this at home”. There are all sorts of shrimp satay, but this version uses a sweet and spicy marinade most often associated with Singapore street food, and if you say “Singapore”and “street food” you will get our immediate culinary attention. (FYI, Singapore created food courts just for street food vendors to control sanitation…..and just maybe tax revenue.)

    satay11satay10satay9
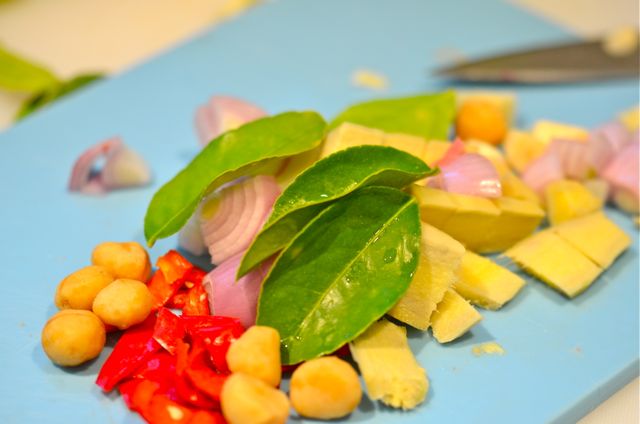
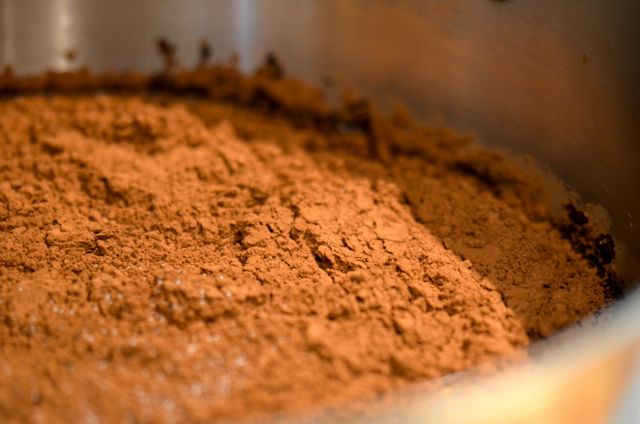
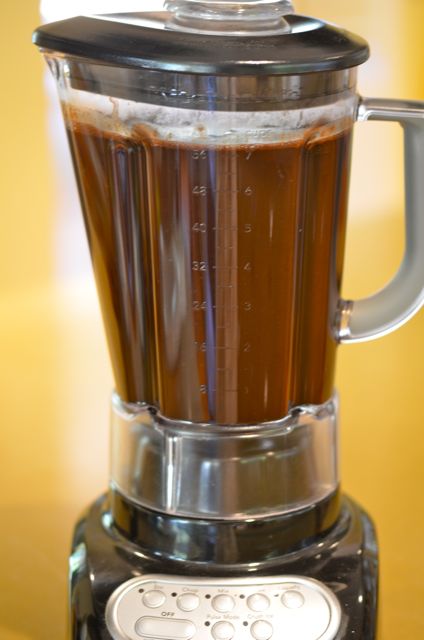
The key to this dish is a spicy marinade with aromatics, coconut milk, hot peppers and a surprise element of crushed macadamia nuts. The nuts are ground so they don’t add crunch, but they do lend a surprising richness to the shrimp that augments the coconut milk. The other slight surprise is a four-hour marinating time, as most fish marinades are under an hour, but in this case the shrimp handle the marinade just fine.

    satay8satay7We found this recipe at Saveur but did make a few changes. Firstly the original recipe calls for three Thai Bird chiles. Thai’s run at 50k to 100k Scoville units and are very hot. If you like spice, but don’t love it, we suggest Cayennes at about 30k or Serranos at 15k. These peppers are still spicy and taste great, but won’t blow your head off. (As it is, don’t breathe too deeply or touch your eyes while making the marinade…trust us on this one.) Secondly, we added some extra coconut milk to mellow the spice a bit more, but you can add less if you like.

    satay6satay4
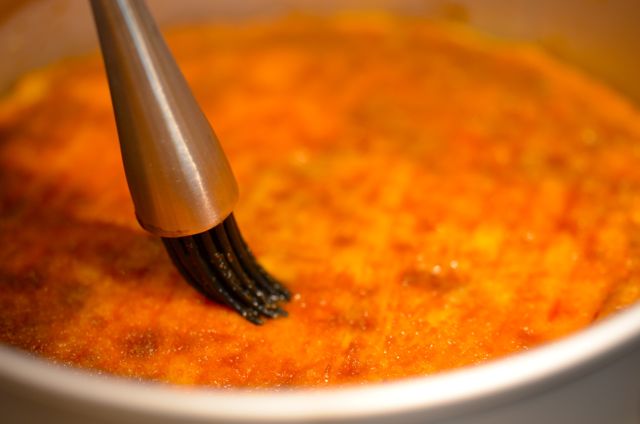
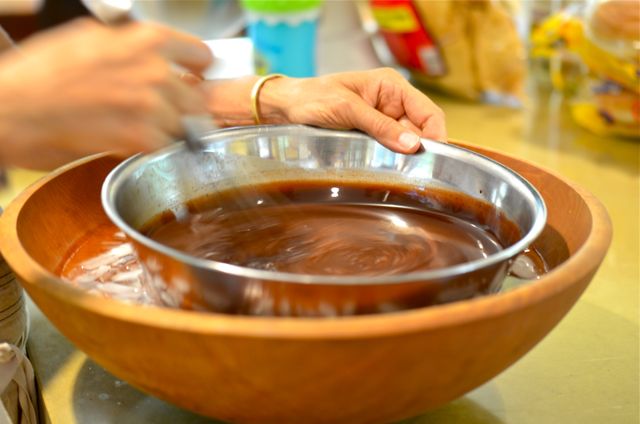
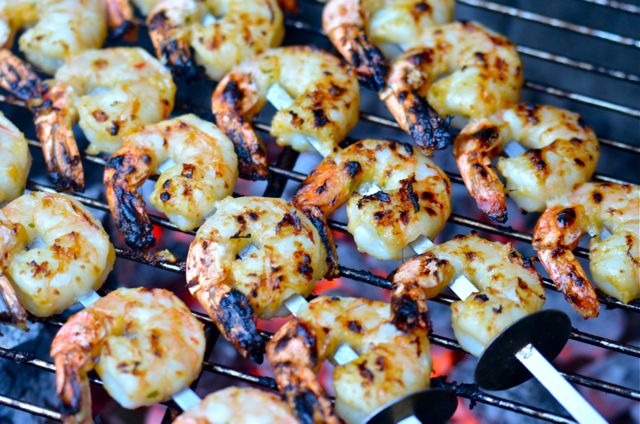
Otherwise, putting this dish together is easy. Process the aromatics and peppers, cook them with the coconut milk, chill the mixture, add the shrimp and marinate for 4 hours. Then skewer the shrimp and cook over a hot fire. The cooking mellows the heat of the chiles and what you get are beautiful charred shrimp with a perfect mix of sweet and spice with just a bit of crunch. Good stuff and a nice change of pace for the holiday. Have fun this weekend!

    satay1Singapore Shrimp Satay (Satay Udang):

    (Adapted from Saveur)

    Notes Before You Start:

    • The size and heat of chiles vary. Thai Bird chiles tend to be small, Serranos medium and Cayennes larger. The original recipe wants three Thai chiles, we used one Cayenne and would suggest two Serranos. Err on the side of less spice, you can always add it later.
    • The recipe also calls for Kaffir lime leaves. If you don’t have the leaves, the zest of a few limes can substitute.

    What You Get: Very flavorful shrimp that work as a snack, with rice or in tacos.

    What You Need: A hot fire.

    How Long? About 4 and a half hours, but only about 15 minutes of active time. The only thing you have to do is wait on the marinade. Weekend dish.

    Continue reading

  • Tiramisu Layer Cake

    Tiramisu Layer Cake.

    Tiramisu Layer Cake.

    We gather that Tiramisu means “pick me up” in Italian. While a fitting translation, in our family it might as well mean “disappearing cake” (or in my case “expanding waistline”). We enjoy all sorts of desserts here at the farm, but everyone (and quite a few friends) agree that Tiramisu is a very special treat. This stuff goes fast. Tiramisu is hard to resist, and as a big cake, it is even harder. Too easy to go for seconds….way too easy.

    tira3tira4In truth, we have a local bakery that makes an excellent version of Tiramisu cake that we occasionally bring home. But Carolyn and the boys decided to make their own, and we are glad they did. After looking at a few recipes, they combined elements from King Arthur Flour, Martha Stewart and our favorite basic yellow cake recipe into a simple, delightful recipe. This cake looks complicated, but it is easier than you might think.

    tira5tira6This Tiramisu cake is really three basic recipes combined into one dish. You have a simple yellow cake, a coffee syrup and the mascarpone filling / frosting. For gear, all you need are cake pans, a springform pan (nice but not required) and an electric or stand mixer and you are business. The only tricky thing about making this dish is cutting layers from the yellow cake. A cake cutter is a nice tool here, but otherwise a serrated knife and some patience will do the trick.

    tira7tira8As for time, this recipe has only 30ish minutes of active time, but the dish does require a few hours of inactive time. First, you do need some time to bake and cool the cake. Next you need to cut the cake layers, brush on the coffee syrup, apply the mascarpone filling and dust on some cocoa powder. Easy enough. But then you need to let the cake set up in the fridge for a few hours, and at least 4 hours is better. For me some of us, those hours did seem to pass sloooowly….but our patience was eventually rewarded with a perfect bite. This cake has everything; light, moist cake, sweet coffee, creamy filling and a blast of cocoa. And it was big enough for a second piece. Excellent.

    tiraTiramisu Layer Cake:

    Notes Before You Start:

    • For cleaner edges and better presentation it is best to build this cake in a springform pan, but you can go without. The cake will still taste great.
    • The yellow cake recipe yields two cakes. You only need one for the recipe, but now you have extra cake. Always good to have extra cake, and this cake freezes well. Otherwise, halve the recipe, if you like.

    What You Get: Tiramisu as a cake. A very good make-ahead dessert for a crowd.

    What You Need: A mixer and 8 or 9 inch cake pans. An 8 or 9 inch springform pan is nice to have.

    How Long? 4 hours with about 30 minutes of active time. You can make this dish any time, just plan ahead to allow the time in the fridge.

    Ingredients:

    (Makes a cake with 12-16 servings)

    Yellow Cake:

    • 3 cups (12 3/4 oz.) all-purpose flour, sifted
    • 1 tablespoon baking powder
    • 1/2 teaspoon salt
    • 1 cup (2 sticks) unsalted butter at room temperature
    • 2 cups (14 oz.) granulated white sugar
    • 4 large eggs
    • 1 cup whole milk
    • 1 teaspoon vanilla extract

    Coffee Syrup:

    • 1/2 cup water
    • 2 teaspoons espresso powder
    • 1/4 cup sugar

    Mascarpone Filling:

    • 1 cup heavy cream
    • 8 oz. mascarpone cheese at room temperature
    • 1/2 cup confectioners’ sugar, sifted
    • Cocoa powder, for garnish

    Assemble:

    Yellow Cake:

    1. Grease 2, 8 or 9 inch round cake pans with shortening and then dust evenly with flour. Tap out excess flour. Place the rack in the lower third of the oven and preheat oven to 350 degrees.
    2. Sift together the flour, baking powder and salt. Set aside.
    3. In the large bowl of your mixer beat the butter until soft and smooth. Add the sugar and beat until light and smooth. Add the eggs, one at a time, beating after each addition. Stop and scrape the sides of the bowl a few times while mixing.
    4. With the mixer at slow speed, alternately add the flour mixture and milk, starting and ending with the flour. Stir in the vanilla.
    5. Divide the batter evenly between the two pans. Smooth the batter in the pans so they cook evenly. Bake in the oven for 30 to 35 minutes, or until a cake tester inserted into the center of the cake comes out clean and the cake tops are lightly springy.
    6. Remove the cakes from the oven and cool in their pans on a wire rack for 10 minutes. Then remove the cakes from the pans and place on a wire rack. Allow the cakes to cool completely before cutting or frosting.
    7. You will have an extra cake with this recipe. You can wrap the cake tightly in plastic and freeze for future use, if you like. (Or just eat some cake.)

    Coffee Syrup:

    1. In a small saucepan stir the syrup ingredients over medium heat until the sugar dissolves. Bring to a full rolling boil, remove from the heat, and set aside to cool.

    Mascarpone Filling:

    1. Using your mixer at medium speed, whisk the heavy cream until stiff peaks form. Do not overbeat the cream, as the you want a smooth texture.
    2. In another bowl, whisk together the mascarpone and the confectioners’ sugar until smooth.
    3. Gently fold the whipped cream into the mascarpone mixture until completely incorporated.

    Tiramisu Layer Cake:

    1. Remove the top brown crust from the cake (so the syrup will soak in). Cut the cake in half horizontally. Place one layer of cake into a springform pan that’s been lined with a piece of parchment or waxed paper.
    2. Sprinkle the cake with half of the coffee syrup. Spread half of the mascarpone filling onto the cake. Top with the second piece of cake. Sprinkle with the remaining coffee syrup and let it sit for several minutes, then top with the remaining mascarpone filling. Refrigerate for several hours or until well-chilled.
    3. To serve, run a thin spatula around the edge of the pan. Remove the springform. Move the cake to a serving platter. Sprinkle with cocoa powder. Serve cold. Refrigerate any leftovers.
  • House-Smoked Almonds (And A California Salad)

    almond

    House-Smoked Almonds.

    almond1

    California Salad.

    Summer is drawing to a close here at the farm. Not so much the weather, it will be warm and sunny for a while, but the kids are returning to school and things start to get busy again. We would like to say that without the rest of the year we wouldn’t enjoy summer as much, but that is just a lie. We like our “slow” time with the kids, friends and family. It doesn’t ever get old. But such is life…the rest of the year arrives whether we like it or not.

    almond4almond3Meanwhile, we do have a few more summer cooking projects to tackle and have worked hard to fit them in. The first was trying sous-vide, deep-fried, all-belly porchetta from j.Kenji Lopez-Alt at Serious Eats (recipe here). It was simply AWESOME, but so rich we will save it for special occasions. Sad to say, no photos, there was a lot going on and when we deep fry we prefer not to be distracted by taking pictures (it’s that hot oil and fire thing). But now that we made the dish, you may see a post for this recipe around the holidays.

    almond5almond6The other, easier, project was smoking our own almonds for snacking and adding to salads. This is something that is just as awesome, even if it seems a bit more umm…normal pedestrian. Smoking your own almonds over fruit woods (with just a touch of hickory) gives you a light smoke flavor, with clear fruity notes that takes the almonds to another level. Finished with a touch of fine salt and olive oil, you have an almost perfect snack with multiple flavors and a delightful crunchy texture. And these are nothing like the heavy salt/fake smoked almonds you buy in a can. These are better in every way. Hard. To. Stop. Eating. Them….Must. Stop. Eating. Them….. 😉

    almond7And smoking your own almonds is incredibly easy, it just takes time and a bit of gear. For the gear you need a stove top or outdoor smoker, but any rig you have for smoking meat will work. You also need a cheap, disposable aluminum pan with holes poked in it to hold the almonds but still let smoke through. For wood, we heavily suggest a mix of 90% fruit wood (apple or cherry) and 10% hickory. The fruit wood is sweeter and the touch of hickory gives that slight “bacony” flavor without overwhelming the almonds.Then smoke the almonds at 225 degrees F for 30 to 120 minutes, depending on your taste (and you can taste during smoking). We went about 80 minutes and thought the flavor had good balance. One note is that the smoke favor will strengthen a bit as the almonds cool, so we suggest you take the almonds out just before you think they have enough smoke flavor.

    almond8While the almonds were warm, we added a touch of fine salt and some olive oil just to coat the nuts. We went about 1 teaspoon of salt and 2 teaspoons of oil to coat 1 pound of nuts, but we suggest you slowly mix and taste as you go, it is all part of the fun. You could add other seasonings or even a touch of citrus zest, if you like. Then let the almonds cool and have at them.

    almond9How to serve the almonds? As a snack is the obvious choice, but smoked almonds truly sing in salads. The sweet, salty, smoky and crunchy notes of the almonds bring almost any greens to life. We like a simple salad of sweet greens, chopped smoked almonds, diced apples and blue cheese with a simple vinaigrette. And since we have both Macintosh and Gravenstein apples ready in the orchard, we got to use our own apples in the salad. We made a “California-grown” theme of it and used local greens (we ate all of ours from the garden already) and blue cheese (Point Reyes Blue) along with the apples and almonds. Delightful, and it could almost compete with the porchetta…almost. But it was a good complement, and we will certainly enjoy this salad more often.

    almond2House Smoked Almonds:

    Notes Before You Start:

    • You want to smoke raw, unsalted almonds if you have access to them. But you can smoke roasted and salted almonds, just smoke for less time and do not add much seasoning.
    • You can experiment with other woods like oak for smoking, but almost all resources suggest using mostly fruit woods to keep the smoke from smothering the sweet almond flavor.

    What You Get: The best almonds you’ve ever had.

    What You Need: An indoor or outdoor smoking setup. A cheap aluminum pan.

    How Long? 2-3 hours, with 20 minutes of active time. Weekend dish, but the almonds keep for a while and can be enjoyed any time.

    Ingredients:

    • 1 pound raw, unsalted almonds
    • Fine salt
    • Olive oil
    • Fruit wood and hickory chips or chunks, for smoking

    Assemble:

    1. Soak your wood chips for at least 30 minutes. Set up your smoker to smoke at 225 degrees. Add the wood chips.
    2. Take a medium aluminum pan and poke holes in the bottom. Place the almonds in the pan and then put the pan in the smoker. Smoke the almonds for 30 to 120 minutes, tasting after 30 minutes. Remove the almonds from the smoker when you get to the desired smoke flavor.
    3. While still warm, place the almonds in a bowl and slowly add the oil and salt, mixing and tasting as you go. When you reach the desired level of salt let the almonds cool and serve.

    California Salad:

    Ingredients:

    (Serves 6-8 as a side salad)

    Salad:

    • 2 heads sweet green lettuce like green-leaf, mache or butter lettuce
    • 1 cup chopped sweet / tart apples like Macintosh
    • 1/2 cup chopped house-smoked almonds (recipe above)
    • 1/4 cup blue cheese, crumbled
    • Kosher salt and black pepper, to taste

    Vinaigrette:

    • 2 tablespoons olive oil
    • 2 teaspoons red wine or sherry vinegar
    • 1 teaspoon Dijon mustard
    • Kosher salt and black pepper, to taste

    Assemble:

    1. For the vinaigrette, combine all ingredients in a medium bowl and whisk until combined. Taste and adjust oil, vinegar and seasoning. Set aside.
    2. Wash the greens and make sure they are completely dry. Tear the greens into small pieces and them place in a large salad bowl. Dress the greens with half of the vinaigrette and add more as needed. Season with salt and pepper.
    3. To finish the salad, place the dressed greens on plates and top with a mix of the almonds, apples and blue cheese. Serve.
  • Mixology Monday LXXVI Cocktail: Special-Ti’

    Special-Ti' Cocktail.

    Special-Ti’ Cocktail.

    ti2Time for another Mixology Monday, the monthly online cocktail party. Let’s start with thanks to Fred Yarm at Cocktail Virgin Slut for keeping the party going and to this month’s host, the Muse of Doom at Feu de Vie (another excellent cocktail blog). The theme, a fitting one in a very hot August, is “Fire!”. Here is the announcement post and the details:

    mxmofire_zps75bb9668Tiki-philes have their flaming spent lime shells and scorpion bowls. Classic cocktailers have the magic of a flamed orange zest. Molecular mixologists have their Smoking Guns. …You don’t have to go full Blue Blazer, not nearly — heck, you could go full Fireball Whiskey! (or Fire Rock Pale Ale, etc.) You could riff on the Old Flame or come up with an inventive name of your own. You could even use a good firewater or burned wine. (and if you’re grilling fruit, save some for me, will ya?) In essence, bring the heat! Bring the Fire! Bring your inspiration!

    ti3Great theme. At first we thought of making a flaming tiki drink, and even ran a few fun experiments with Lemon Hart 151 in all sorts of vessels (it lights easily, btw). But after a while, we figured that we would see plenty of flaming tiki, and in better tiki bowls and cups than we have at the farm (we are working on adding to the collection). We also looked at flaming citrus peels over classics, as the announcement post suggests, but nothing really popped. But then a few days ago we used a brulee torch to make Chocolate S’more-bet Sundaes and we decided to use the torch in our Mixology Monday cocktail. Might as well use the thing…

    ti4So what to make? This part was surprisingly easy. We decided to deconstruct one of our favorite summer desserts, pineapple with lime zest and molasses, into a cocktail. We started with the garnish. We cut wedges of pineapple, coated them with dark brown sugar (turbinado or muscovado would also work), caramelized the sugar with the brulee torch and then added lime zest. You could eat this on its own and it is quite good, but a bit one-dimensional.

    ti5But we then made a hack of the standard Ti’ Punch (lime, cane syrup, rhum agricole) and dipped the caramelized pineapple wedges into the drinks and ate the pineapple. We tried a bunch of rums from dark to light, regular rum to a few types of rhum agricole. In the end, we liked Rhum Barbancourt 5-Star, an 8 year-old rhum from Haiti best. We also went light on cane syrup, as we learned that the caramelized sugar from the pineapple would mix into the drink and sweeten as we went along.

    ti6ti7So what did we get? A successful cocktail dessert. Both the cocktail and the garnish would be OK by themselves. But when combined, the sweet acidity of the pineapple, the intense (almost buttery) rum, sour lime and deep sugar flavor all play very well together. The extra texture of the pineapple and lime zest is also welcome. Great fun and something we will make again.

    ti8So thanks again to the Muse of Doom and Fred Yarm for another great Mixology Monday. We can’t wait to see he roundup.

    ti1Special-Ti’:

    Ingredients:

    Garnish:

    • Pineapple wedges
    • Dark brown sugar
    • Lime zest
    • Wooden or metal skewers

    Cocktail:

    • 2 oz. rum (Barbancourt 5-Star)
    • 1 oz. lime juice
    • 1/2 oz. cane syrup (or rich simple syrup)

    Assemble:

    1. Push the skewers lengthwise through the center of the pineapple wedges.
    2. Liberally sprinkle the pineapple wedges with the brown sugar and then caramelize the sugar with a brulee torch (or place on a baking sheet under a very hot broiler for about 30 seconds, or until brown). Quickly sprinkle on the lime zest before the caramelized sugar hardens.
    3. Place the pineapple wedges in the fridge for a few minutes to help the caramelized sugar harden.
    4. Meanwhile, combine the rum, lime juice and cane syrup in a cocktail shaker with ice. Shake until well-chilled and strain into a chilled cocktail glass or coupé.
    5. Garnish the cocktail with the pineapple wedge and serve.
    6. We suggest starting by dipping and eating the pineapple and then finishing the remaining cocktail. Enjoy.
  • Chocolate S’more-bet Sundaes

    Chocolate S'more-bet Sundae.

    Chocolate S’more-bet Sundae.

    We love summer here at the farm. Not only for time with friends and produce from the garden, but also the opportunity to hit the road and travel. And while there are all sorts of reasons we like to roam, new food does seem to play a central role in our choice of destinations. Clam shacks in Long Island, shrimp boils in the Low Country and farmers markets in Kauai are all things that will tempt us away from our gardens. And there is a bonus to all this travel…the best dishes come back with us. And this dish, inspired by (the incredibly awesome) Penny Ice Creamery in Santa Cruz, didn’t have to travel far to make it back to the farm (just a hop over the hills).

    smoresmore1And this is one of the best desserts we’ve found since we started blogging. A simple combination of chocolate sorbet, toasted marshmallow creme (more on this in a bit) and graham crackers, this is one tasty take on the classic s’more. Penny Ice Cream serves this on a waffle cone and browns the top with a brulee torch. We serve it as a sundae and add the graham crackers instead of a cone, but you will be happy either way. The combination of flavors and textures is a delight.

    smore2smore4smore5As for browning the marshmallow creme, it is easier than you think. If you have a brulee torch (and being total geeks, we do) just torch a scoop of fluff before service. If you don’t have a torch, just place a scoop of creme on a piece of graham cracker and put it under the broiler for 30-60 seconds. Then place the cracker and creme on top of the sorbet. It will look a bit different, but taste just as good.

    smore6smore7smore8What about the sorbet? If you haven’t had chocolate sorbet, you really should. The best recipes are just chocolate bombs, but have a lighter texture than ice cream and won’t fill you up (quite) as much. Easy to make, as well. There are many recipes out there but most seem to be a riff on a David Lebovitz recipe. And his recipes are certainly good enough for us. The key here is the combination of chocolate and cocoa powder, it’s like a chocolate punch in the mouth…but in a good way. This sorbet is great by itself, but add a bit of marshmallow and some graham crackers, and you may have the perfect summer treat.

    smore9Chocolate S’more-bet Sundaes:

    (Inspired by Penny Ice Creamery and David Lebovitz)

    Notes Before You Start:

    • No notes, go make dessert before summer is over.

    What You Get: A perfect summer dessert and a much better (IMHO) version of the classic s’more.

    What You Need: An ice cream maker and a blender. No other special equipment required.

    How Long? Maybe 30 minutes of active time, with a few hours of inactive time to chill the base and make the ice cream. Weekend dish, but the sorbet keeps well.

    Ingredients:

    • 2 1/4 cups (555 ml) water
    • 1 cup (200 g) white sugar
    • 3/4 cup (75 g) unsweetened Dutch-process cocoa powder
    • Pinch of salt
    • 6 ounces (170 g) bittersweet or semisweet chocolate, finely chopped
    • 1/2 teaspoon vanilla extract
    • Marshmallow creme
    • Graham crackers

    Assemble:

    1. In a large saucepan, whisk together 1 1/2 cups (375 ml) of the water with the sugar, cocoa powder, and salt. Bring to a boil whisking frequently. Let it boil, continuing to whisk for 45 seconds.
    2. Remove the mixture from the heat and stir in the chocolate until it’s melted, then stir in the vanilla extract and the remaining 3/4 cup (180 ml) water. Transfer the mixture to a blender and blend for 15 seconds. Chill the mixture thoroughly with an ice bath or in the fridge (down to at least 40 degrees F), then freeze it in your ice cream maker according to the manufacturer’s instructions. If the mixture is too thick to pour into your machine, whisk it to thin it out.
    3. After making the sorbet, harden it in the freezer for at least an hour.
    4. To make the sundaes, place a scoop of sorbet in a  bowl and top with marshmallow creme. Torch the creme with a brulee torch and garnish with graham crackers.
    5. -OR- Place a scoop of creme on a piece of graham cracker and broil for 30-60 seconds in the oven, until lightly brown. Place the cracker and creme on the sorbet. Serve.
  • Gin, Tonic And Campari

    Gin, Tonic and Campari.

    Gin, Tonic and Campari.

    August. The Dog Days of Summer. It’s hot. Vacation, beach, family. Time for a drink or six. But what to drink? If you want to geek up, then tiki is a good pace to play. Punches are always welcome when you have a crowd and need an easy, tasty drink. But for many of us, summer means beer or a highball (a big, easy drink in a tall glasses with ice). And while there is nothing wrong with an ice-cold beer this time of year, we can’t seem to stay away from the bar for long, and that means highballs. And if we are drinking highballs it’s most likely a gin and tonic. (Although a Florodora is another option worth making, btw.)

    gtcgtc2We do love a gin and tonic, and it is often our default drink when we are traveling and aren’t sure about the quality of drinks we may get. After all, Tanqueray, Canada Dry tonic and a squeeze of lime are available from the Arctic Circle to the Congo (even in Brooklyn). Along with a Scotch and Soda (the other classic highball), you should be able to get a decent GnT almost anywhere on the planet.

    gtc1gtc4But just because we can get one almost anywhere doesn’t means we don’t like to play around with classics, and the GnT is a very open field. You can play with the gin, the tonic, the citrus or even add some “other stuff”. As for gin, there are almost too many options to consider, but we still like Tanq, simply because it is tasty, available and predictable. As for tonic, this is a good place to experiment, but Canada Dry still wins many taste tests with Fentiman’s and Fever Tree also doing well. We like all three, but the sweeter Canada Dry still plays well with the juniper-heavy flavors of Tanqueray. Feel free to play around, almost any combination will be good, but some will truly sing. It is worth finding a combination you like. As for the citrus, just stick with lime, trust us.

    gtc5gtc6But then there is the “other” stuff. And in this case, we mean Campari. At times, we have a love/hate relationship with that bright red, bittersweet booze. But when you put about 1/4 ounce (or a bit more) of the stuff into a Gin and Tonic and add a bit more lime juice, you get something close to perfect carbonated pink lemonade…with booze. We don’t understand the alchemy, since there is no lemon (directly) involved, but who cares? This is a great drink. And the warmer it is, the more refreshing it gets. Perfect for August.

    gtc7So where did we hear about this drink? Frankly, we have no idea. But it must have come from somewhere. We did find a funny article from a few years ago about this cocktail, and it worth a read. But it didn’t add a new name to the drink. It is still just a Gin and Tonic with Campari. But that is good enough for us, and we couldn’t come up with a good name anyway, although we were tempted to call this the “Blushing Preppie”. Maybe with a dash of bitters we can change the name….

    gtc8Gin, Tonic and Campari:

    Ingredients:

    • 2 oz. dry gin (Tanqueray)
    • 1/4 oz. Campari
    • 3-4 oz. tonic water (Canada Dry)
    • 1/2 lime

    Assemble:

    1. Add a bunch of ice to a tall glass. Squeeze the lime juice into the glass and add the spent lime shell into the glass. Add the gin, Campari and tonic. Stir and add a straw, if you like. Serve.