Kobe Beef Tri-Tip Roast. A special treat.
It may seem like sacrilege, but we don’t serve turkey at Thanksgiving. No ham either. Nope, we serve a version of our slow-roasted pork with apples and fall herbs and some kind of roast beef. If we have a big crowd, we roast a whole Tenderloin, but if we have a small crowd, we roast a Tri-Tip. And if we want to splurge, a Kobe Tri-Tip is one of our favorite roasts.

 The Tri-Tip is a triangular 2 to 2 and 1/2 pound cut of beef from the bottom sirloin primal of the cow. It has strong beefy flavor and, if cooked and sliced properly, is quite tender. Out here in California, “Santa Maria Style” Tri-tip, lightly seasoned and slowly cooked over red oak to medium-rare, is a very tasty regional specialty. And if you go into most butcher shops here in Norcal, you will find many custom Tri-Tip preparations and marinades (the black, ugly, but incredibly tasty “Fred Steak” is a local specialty). And as a special treat, most butchers feature a Kobe Tri-Tip. And this is a very special treat.

 While it’s expensive, the Kobe Tri-Tip is a great intro to Kobe beef. Kobe beef is a special type of beef with extra marbling of fat (fat is flavor) and very tender meat. Kobe is expensive, but the Tri-Tip is one of the more affordable cuts and is easy to prepare. The beefy flavor of the Tri-Tip doesn’t need much help, so we simply prepare a quick rub of olive oil, salt and pepper and let the steak marinate for at least four hours or overnight. Then you simply sear the outside of the meat for flavor and then slowly roast until the internal temperature reaches 130 to 135 degrees for medium-rare.

 We use our sous-vide machine for the Kobe Tri-Tip, as we can exactly control the internal temperature (we target 131). We then sear in a cast iron pan, slice and serve. But you can grill Tri-Tip using a two-level fire, or roast in a hot oven. We include cooking instructions for each method. The key to any Tri-Tip recipe is to avoid overcooking, so regardless of method, be sure to pull the roast from the heat before it reaches the target temperature (it will still gain five to ten degrees) and allow the roast to rest at least ten minutes before you slice and serve. And be sure to slice across the grain for a more tender bite. And now you have a very tasty roast that is the perfect size for four to six guests.
 So if you have a small group of guests for Thanksgiving, we have a suggestion. Make all the traditional sides like mashed potatoes, sweet potatoes, creamed spinach, stuffing, cranberries and pie. Pop open a good bottle of wine or cider, maybe make some punch. But save yourself a lot of time and cook up a Tri-Tip. And if you are feeling flush, try out a Kobe Tri-Tip. You won’t have to struggle with a turkey and you will have very happy guests. And if you just can’t bear the thought of beef at Thanksgiving, Tri-Tips are just as good for a casual weekend roast. Tri-Tip makes a good meal any time.
Beef Tri-Tip Roast:
Notes Before You Start:
- Tri-Tip is sometimes called “triangle steak”. If you can’t find Kobe Tri-Tip, ask your butcher, it is a popular cut and usually can be ordered.
- Tri-Tip does not have a lot of intra-muscular fat and is not a good roast to cook past medium rare. If you need to cook a roast past medium, other cuts will do better.
What You Get: A quick, easy, tasty and tender beef roast.
What You Need: No special equipment required. But a digital thermometer, or meat thermometer reduces the risk of overcooking. We cook this roast sous-vide, but the grill or oven also work well.
How Long? If grilling or oven-roasting this dish takes about 20-30 minutes. Sous-vide cooking will take 4-8 hours and then 2-3 minutes of searing the meat. The beef benefits from an overnight marinade.
Ingredients:
(Serves 4 – 6)
- 2 tablespoons olive oil
- 1 tablespoon kosher salt
- 1 teaspoon freshly ground black pepper
- 1, 2 and 1/2 pound Tri-Tip roast, trimmed (Kobe, if you like)
- Vegetable oil or bacon fat, for searing (if cooking sous-vide)
Assemble:
- Combine the oil, salt and pepper in a small bowl and mix well. Dry off the Tri-Tip and coat with the oil mixture. Put the roast in a container or plastic bag and then place in the fridge for 4 -12 hours.
- If charcoal grilling: Build a two-level fire. Sear the roast for 2-3 minutes on each side, on the hot side of the grill. Then move the roast to the cooler side of the grill. Cover the grill and cook the roast, turning occasionally, until you reach an internal temperature of 125-130 degrees, about 20 minutes. Remove the roast from the heat and let it rest at least 10 minutes. Slice and serve.
- If gas grilling: Set up the grill for high heat. Sear the roast for 2-3 minutes on each side. Then move the heat to low, cover the grill and cook the roast, turning occasionally, until you reach an internal temperature of 125-130 degrees, about 20 minutes. Remove the roast from the heat and let it rest at least 10 minutes. Slice and serve.
- If oven roasting: Preheat the oven to 425. Place the roast in a roasting pan (with a rack, if possible) and put the pan in the oven. Cook for 5 minutes and then lower the heat to 350. Cook cook the roast, turning occasionally, until you reach an internal temperature of 125-130 degrees, about 20 – 30 minutes. Remove the roast from the heat and let it rest at least 10 minutes. Slice and serve.
- If using sous-vide: Set the sous-vide temperature to 131 degrees (or your desired temperature). Remove excess oil from the roast and seal in a vacuum bag. Cook sous-vide for at least 4 hours, 6 – 8 is preferred. When the roast is done, heat vegetable oil or bacon fat in a skillet over very high heat. Sear the roast 1 – 2 minutes on each side, or until well browned. Slice and serve.
- Smoked Tri-Tip (fabulousfamilyfood.wordpress.com)
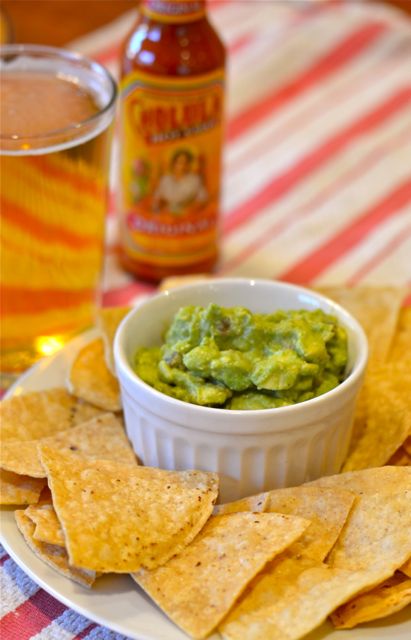
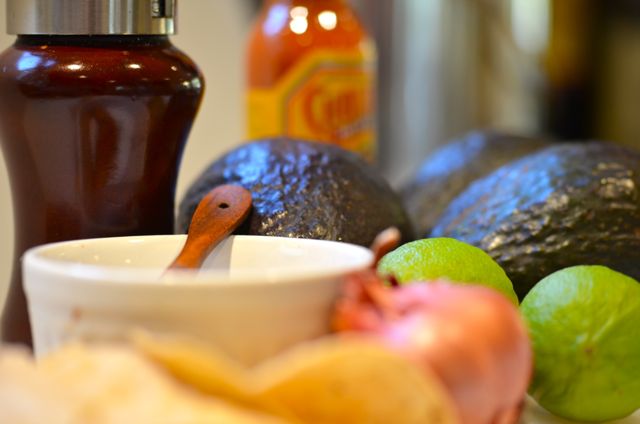
 There isn’t necessarily anything wrong with this type of guacamole, and if you have a recipe you like, please use it. And if the avocados aren’t at their best, adding more flavors will certainly help. But what if you have really good, ripe Hass (you really want Hass) avocados? We suggest you cut one open and taste it. Maybe add just a dash of salt. Doesn’t it taste great? Sweet, clean and creamy with some earthy notes? Beautiful color? Yes? Then maybe you can try a version of guacamole that is all about the avocados.
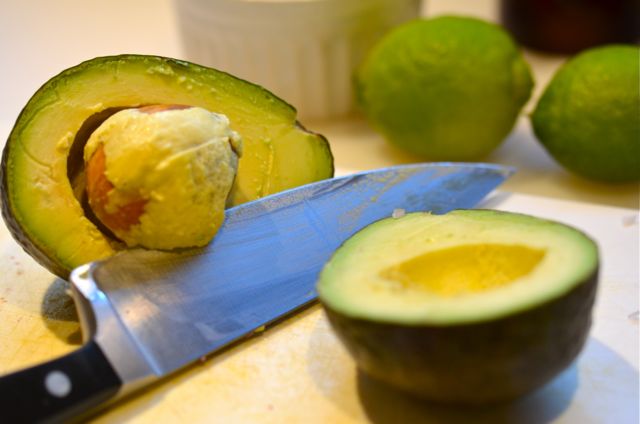
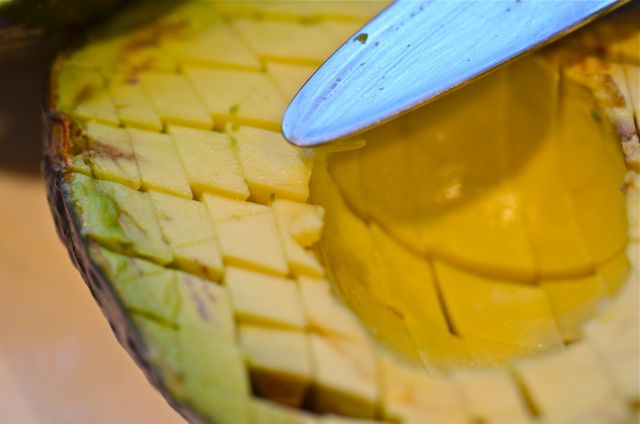
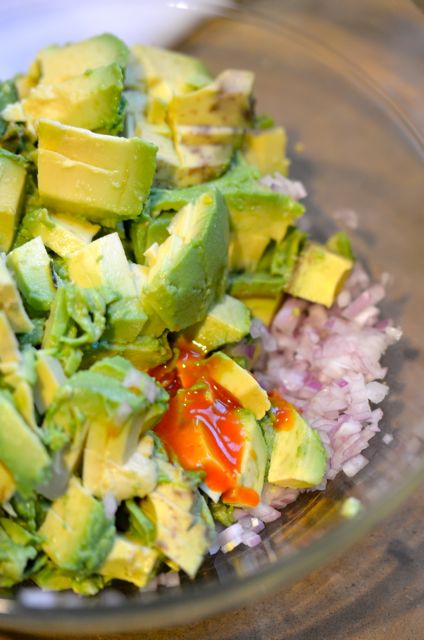
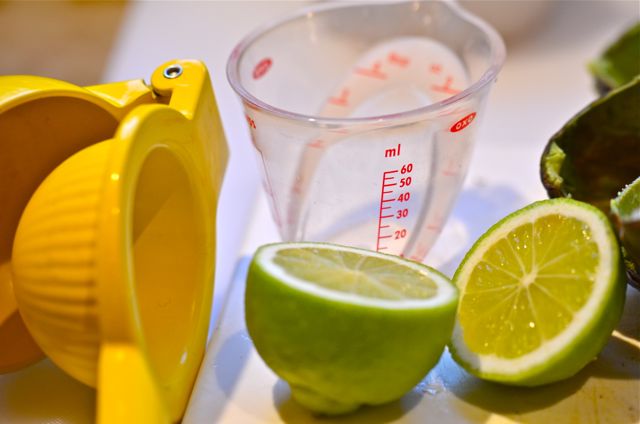
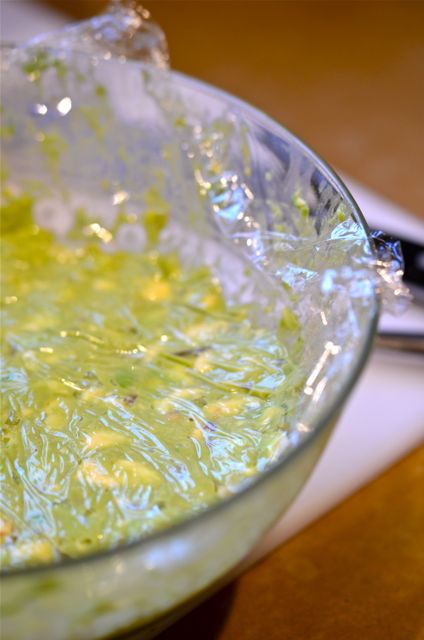
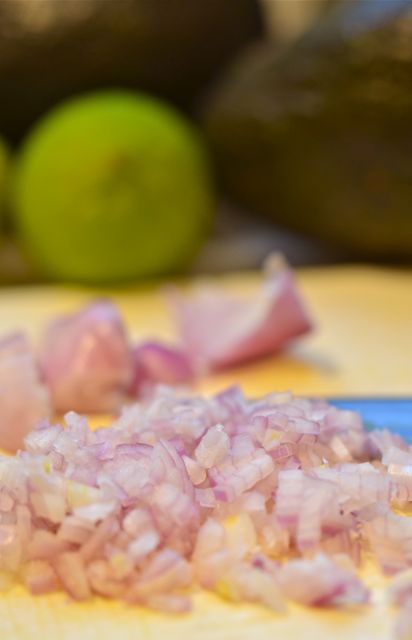
 And we do have a basic recipe that really works when avocados are at their best. Three avocados, one minced shallot, the juice of half a lime, a teaspoon of salt, a pinch of black pepper and a scant teaspoon of hot sauce. Dice the avocados with a butter knife in their skins (see the photos). Add the diced avocado to the other ingredients and fold them together, so some of the avocado chunks mash, while some keep their shape. Taste, tune (just a bit) and refrigerate for at least three hours. The taste again, the flavors will have melded and mellowed. Season with more salt, lime and/or hot sauce one last time, and then serve.