• The Viveka Cocktail And Homemade Limoncello

    viv

    The Viveka Cocktail.

    Many months ago we asked for our readers to guess the location of a photo we took in Kauai. The winner would get a cocktail named after them. The winner was our friend Viveka from My Guilty Pleasures, a blog about life with all it’s humor, delights, food and travel. It is also a blog about friendship. Viveka seems to collect friends, both in the physical and virtual world, at a very steady clip. She has a big, warm, generous heart.

    viv4viv5viv6Viveka is also patient. Because once she won our little contest, we knew we had to use a special homemade ingredient in her cocktail; limoncello. The only problem was that limoncello, while easy to make, takes a while. Like a few months. But we warned Viveka of the impending wait. And then we waited. And waited. But finally the wait is over.

    viv7
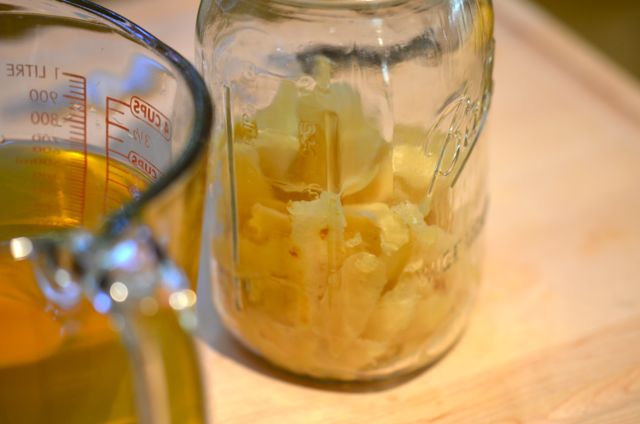
Limoncello is basically a liqueur of lemon zest (with as little white pith as possible) soaked in grain alcohol (or strong vodka), strained and then sweetened with sugar syrup. You get a sweet, lemony liqueur without any sour notes. It’s good stuff. While you can make limoncello in just a few days, an infusion of 30-45 days is generally considered the best method. The you need to strain and filter the zest from the very-strong booze and add some simple syrup to get to about 60 proof and age it again for another 45 days (most people shorten this step). But since we are making cocktails, we took a slightly different path.

    viv3viv2
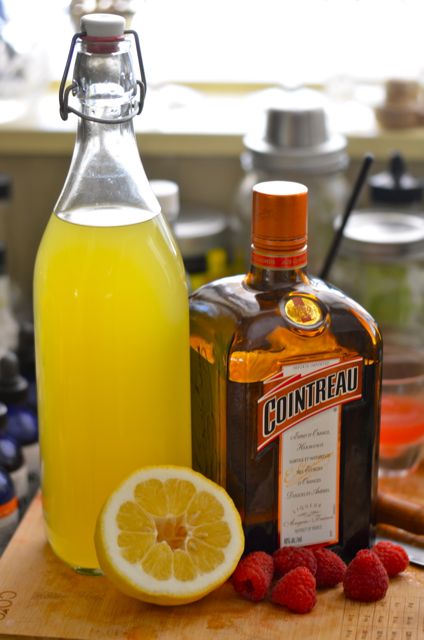
Our one issue with limoncello in cocktails is that it is a bit sweet and not strong enough to lead a cocktail. It is good as an accent, but we thought it could fully replace gin or vodka if our limoncello was stronger and dryer. So rather than use a mix of 50% or more simple syrup, we went with about 35-40% syrup. And since we were using 135 proof Everclear as our base, we ended up at about 90-100 proof. The limoncello is a bit strong on its own, but has the juice to carry a cocktail and gives a slight warming feel as you drink it. Not too hot or boozy, but you know it’s there.

    viv8And that was exactly what we wanted for our special cocktail. Our friend Viveka is not a fan of dark booze like rum or whiskey, so we wanted to use a “clear” booze. We do enough gin drinks around here, so that was out. And since Viveka is from Scandinavia, we figured she knows her vodka. Boozy limoncello seemed liked a good fit. And we even had a recipe in mind.

    viv9
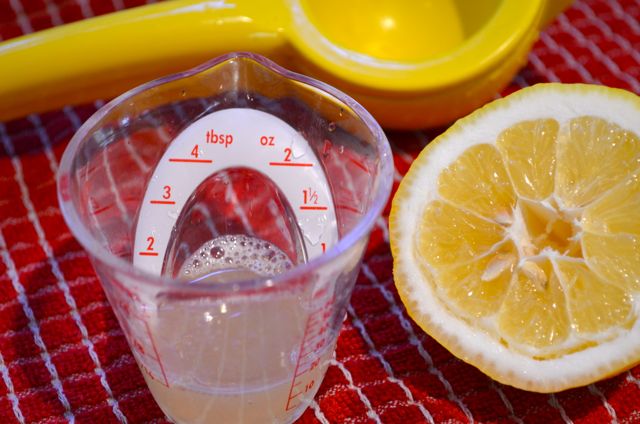
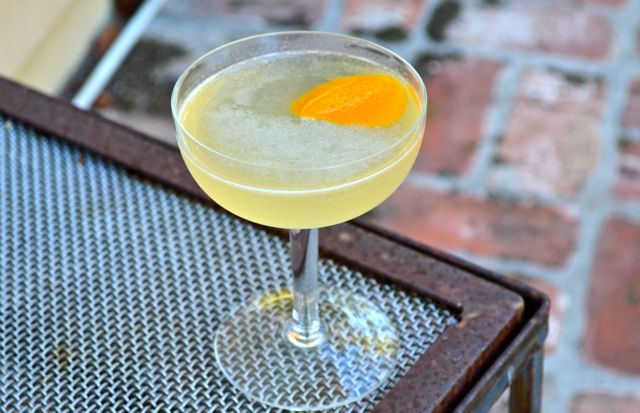
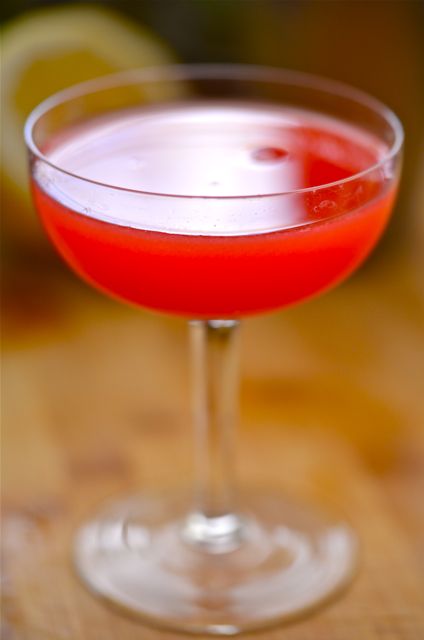
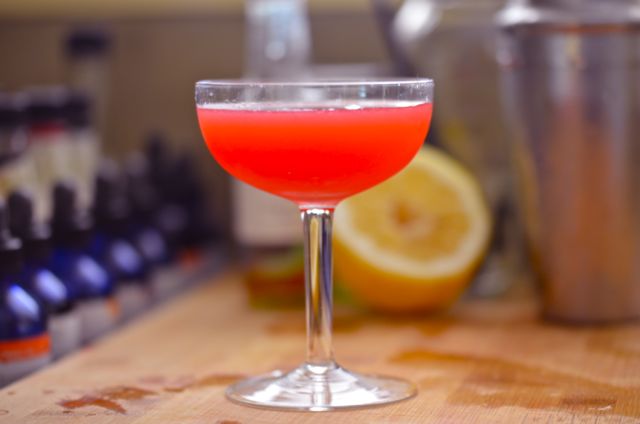
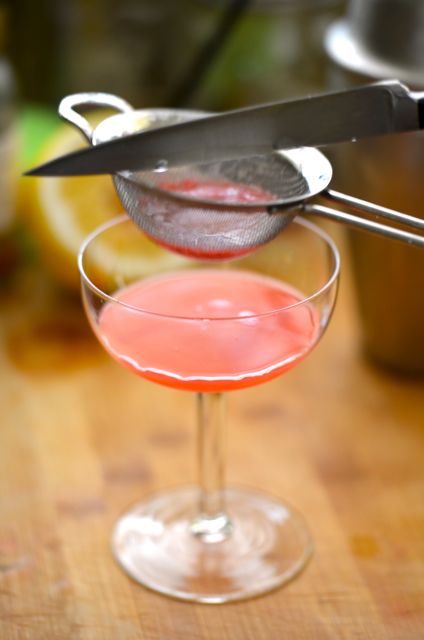
The Viveka combines, boozy limoncello, Cointreau, lemon juice and muddled raspberries (or raspberry syrup, if you must). The drink is a riff on the 1934 Cosmopolitan (an older,  lesser-known- but IMHO better- version of the Cosmo), with the boozy limoncello replacing gin and fresh raspberries rather than syrup. (If using lower-proof limoncello, just add 1/2 oz. good vodka and a touch more lemon juice). What you get is a bright lemon sip that isn’t particularly sour, mixed with sweet orange and raspberry notes that almost seem to dance around. On the finish you get a nice warm kick from the limoncello. This drink has a warm heart, just like Viveka…..Here you go Wivi!

    viv1 Continue reading

  • BBQ Brisket, Franklin Style

    brisketbrisket2Brisket+Salt+Pepper+Smoke+Time= East Texas Barbecue Beef Brisket, perhaps one of the greatest American dishes. If you get it right, you get true alchemy. A very humble piece of cow turns into a rich, luscious and flavorful meat you can eat just with your hands and really doesn’t need sauce. A little piece of heaven. And it seems so simple…

    brisket3…but it isn’t. Barbecued brisket, at least really good barbecue brisket, is hard. Really hard. Even pros regularly turn out dry, over-seasoned, poorly smoked failures. And while we aren’t pros, we take pride in our ‘cue. But where we succeed with barbecued pork shoulder or ribs, we often fail with brisket. And it is even more frustrating that we can make a great Jewish-style brisket in a dutch oven or slow cooker. Aargh. And after many failures, we were about to throw in the towel.

    brisket4But just as we had given up, we heard about Aaron Franklin and his YouTube barbecue series. Aaron Franklin, it turns out, is considered one of the best (really, the best) pitmaster in Austin Texas. People we trust (friends and pros) sing his praises, and his brisket is the standard by which others are measured. We haven’t been to Franklin’s (yet) but he was kind enough to provide a step-by-step video series on how to make his brisket. So we decided to try just one more time…

    brisket6And it worked. The steps are simple, but detailed. You need to customize for your gear / setup, but if you get the spirit of it, you will have some very tasty brisket. We heavily recommend suggest you watch the series, but here are the basics: get a good piece of brisket (whole brisket, Creekstone or Certified Angus, don’t worry about the cost, this dish feeds an army and is affordable), trim it well, season it evenly with salt and pepper, smoke it over oak for about 12 hours (depending on the brisket), keep water pans in the smoker, wrap the brisket in butcher paper (or foil, the “Texas crutch”) about halfway through cooking, when done let it rest and then slice pencil thick and serve. And if you just have to have sauce, Franklin gives you a good recipe.

    brisket7Oh, and do it 3 or 4 times over the summer. Each time you will get a bit better, and each time your family and friends will eat a bit more. A good project.

    brisket8Now, we will cop to making some changes to deal with our Big Green Egg smoker. We use charcoal and wood chunks, and not just wood. And we use local red oak, rather than Texas post oak (and just a touch of local apple wood as well). And since we smoke on a Green Egg over somewhat direct heat, which can dry out barbecue in long cooking, so we decided to wrap in foil and finish the last few hours on the oven. Many will consider this sacrilege, but we know our Green Egg, and finishing in the oven works better (sorry purists, it does). But if you have a an offset smoker, you should be able to wrap the brisket and finish it on the smoker.

    brisket10What do you get? More flavor than you would ever expect. And the juiciest, tenderest meat you can imagine. The magic of smoke never ceases to amaze. The bark has the complexity of good wine, the meat is sweet and the fat like butter (but way better). It may have taken 12-14 hours, but it will be time well spent. Now just slice and serve with some slaw, maybe some white bread, and sauce if you like. Then serve the large group assembled around you…and take a nap….you deserve it.

    brisket1BBQ Brisket, Franklin Style:

    (Adapted from Aaron Franklin video series)

    Notes Before You Start:

    • You need a “full packer” brisket that includes the “point” and “flat” sections of the brisket. It should be at least 10-12 pounds, if possible (and they go much bigger). Franklin uses Creekstone Farms beef (you can order online) and we do as well. This is the good stuff and worth the money.
    • If you trust your butcher to trim the brisket to your specs, have him (or her) do it. Otherwise, follow the steps in the video.
    • While you can use any wood for smoking, this style really works best with oak. Maybe a touch of fruitwood. But heavily flavors like hickory or mesquite will dominate the basic salt and pepper rub.
    • Always use a water pan (or two) while smoking to keep humidity in the smoker.

    What You Get: A true American classic.

    What You Need: A real smoker of some form. A Webber won’t really work here. An offset smoker would be the best choice.

    How Long? Expect about 14 hours for a 12 pound brisket. But it could be more, or a little less. Get started very early in the morning and have beer ready for an all-day event.

    Ingredients:

    • 1, 10-12 pound “full packer” brisket
    • 1/2 cup salt
    • 1/2 cup fresh ground pepper, finely ground
    • Oak wood, chunks or chips, for smoking.

    Continue reading

  • Banana-Chocolate Chip Squares

    spelt2spelt1speltWhen life gives you lemons, make lemonade. And when bananas turn black, might as well start baking. In fact, for many (ok…me), old bananas baked into desserts are a much better way to leverage the soft, sweet fruit than raw preparations. And if you happen to add some dark chocolate and some spice, well then you are onto something. Something good. Something called Banana-Chocolate Chip Squares.

    spelt5spelt6Happily, Carolyn hates to be wasteful, so when those bananas get black, the boys and I get this treat. But Carolyn is still a Mom (with a capital M) and that means if we get sweets, something healthy often gets snuck in as well. Usually this means some whole wheat flour in baked goods. And while we like whole wheat flour, sometimes it makes for dense and somewhat bitter-flavored dishes. That is OK for bread, but for sweets, a total bit of a bummer. But Carolyn has an answer (doesn’t she always?).

    spelt7spelt8In the case the hack solution is to use spelt flour rather than whole wheat. Spelt is an ancient “proto-flour” that behaves in similar fashion to whole wheat but with softer flavor. So you get some of the nuttiness of whole wheat, but very few bitter notes. In fact, other than slightly denser texture, it would be hard for even a trained palette to notice and bitter flavor at all. And since you get a big dose of the sweet bananas and chocolate, along with spice, all you will really notice is how good these squares are. And if you add in some vanilla ice cream, it is even better. Think “banana split as it should have been” and you might be close.

    spelt9spelt10Like many of our recipes, Carolyn adapted the basics from King Arthur Flour (no, we aren’t on the payroll yet, but one can always hope…). The main adaptation is substituting white chocolate chips for chopped walnuts. Our kids don’t love walnuts in baked goods, so why not add more chocolate? And besides, we are using spelt to avoid bitter flavors, so why risk it with a tannic ingredient like walnuts?

    spelt11Nope, we will always take more chocolate. And like we said, if you serve this with ice cream, the dish goes from good to great. Now maybe we need to add some burnt caramel sauce…maybe even a hint of salt…hmmm….

    spelt4Banana-Chocolate Chip Squares:

    (Adapted from King Arthur Flour)

    Notes Before You Start:

    • Nope, get cooking.

    What You Get: Something like a Blondie, but much better. A good use for over-ripe bananas.

    What You Need: Old bananas.

    How Long? About an hour, or so. Mostly inactive time. You can make this dish any time you have the over-ripe bananas.

    Ingredients:

    (Makes 2 dozen, 2-inch squares)

    • 3/4 cup (1 1/2 sticks, 6 oz.) unsalted butter, softened
    • 1 1/4 cups (9 3/8 oz.) dark (or light) brown sugar
    • 3 very ripe medium bananas, about 8 oz. peeled
    • 1 tablespoon lemon juice
    • 1 teaspoon vanilla extract
    • 3/4 teaspoon baking powder
    • 1/2 teaspoon salt
    • 2 teaspoons ground cinnamon
    • 1/4 teaspoon freshly ground nutmeg
    • 1 large egg
    • 1 3/4 cups (6 1/8 oz.) whole spelt flour
    • 1 cup (6 oz.) semisweet chocolate chips
    • 1 cup (6 oz.) white chocolate chips

    Assemble:

    1. Place a rack in the middle of the oven. Preheat oven to 350 degrees F. Grease a 9×13-inch baking pan.
    2. Cream the butter and sugar in a medium bowl until smooth. Beat in the bananas, lemon juice, vanilla, baking powder, salt and spices, scraping the sides of the bowl. Add the egg, beating until smooth and scraping the sides and bottom of the bowl, again. Stir in the flour, mixing thoroughly.
    3. Spoon the batter into the prepared baking pan. Allow the batter to rest for 15 minutes, it will thicken slightly. Sprinkle the chocolate chips on top of the batter.
    4. Bake the squares in the oven for 35-40 minutes, or until the center is moist, but not liquid. Remove the pan from the oven and cool on a rack.
    5. For the best texture you can cool the squares overnight (if you have the patience). Cut and serve with vanilla ice cream, if you like.
  • Weekly Cocktail #58: Embury’s Larchmont

    larch2Well, summer is “over”, at least in the family sense. Kids are back in school, work cranks up, and the holidays are already an insidious little whisper in your ear. So it starts again. Good thing Autumn also brings the harvest, the fall colors and (in Norcal) some good waves. And a few cocktails always help to re-acquaint oneself with “real life”.

    larch4But before summer was over I did get to do a full read of David A. Embury’s famous 1950’s cocktail book “The Fine Art of Mixing Drinks“. Embury’s book is unique for a few reasons: he was a lawyer not a bartender and rather than simply list recipes he tried to design a way to classify cocktails in a more orderly fashion. And the book does succeed in giving any home (or pro) bartender a foundation for creating thousands of drinks. (Just ignore the often hilarious heath and medical advice, unless you are the type who thinks smoking is still good for you, then by all means, listen to “Dr.Embury”).

    larch3Embury makes the case that almost any cocktail is simply a base (the spirits) and modifiers (sugar, citrus, aromatic wines, bitters, liqueurs, etc.). He also classifies most cocktails into two families. The first family is “aromatic” cocktails using spirits with aromatic wines (vermouth, quinquina, sherry) and bitters, think Martinis and Manhattans. The second family of cocktails are the “sours”, drinks with spirits, citrus (usually lemon or lime) and a sweetener (sugar, syrups, liqueurs), think Daiquiri, Whiskey Sour, or (these days) a Margarita.

    larch5This system certainly works for most cocktails and other writers, most notably Gary Regan in the “Joy of Mixology“, expanded on these basic concepts. Good ideas and tools do seem to travel through time. But some of Embury’s concepts (along with his medical advice) have not aged quite as well. And in this case, we mean the proportions of his cocktails.

    larch6You see, Embury liked his cocktails dry. And we mean dry. For aromatic cocktails, he often liked a 7 to 1 (base to modifier) ratio, which fits many current tastes. But for sours, Embury suggests 1 part sweet, 2 parts sour and 8 parts spirits. Embury, it seems, liked to taste the booze in his cocktails. And while most of the drinkers here at the farm agree, we usually go 1 part sweet, 1 part sour and 2 parts spirits (and we see some recipes suggesting 1:1:1). But before we wrote off Embury’s ratios, we gave them a try in a few recipes.

    larchHow did it go? Well, the drinks are very dry and we would prefer both a bit more sweet and sour. But we were surprised, particularly if big fans of the base spirit, how much we liked the drier cocktails. They don’t always work, but when experimenting with a recipe you like, we suggest trying an “Embury-esque” version, you may be surprised…..besides, you get to try another drink.

    larch1Interestingly, Embury has a recipe for one of his favorite sour cocktails, the Larchmont (a town in Westchester), that is a bit of a hack on his 1:2:8 ratio and is a good “gateway” into his style of mixing. The Larchmont, a Daiquiri variant,  combines 1/2 part simple syrup, 2 parts lime juice, 2 parts Grand Marnier and 6 parts white Cuban rum with an orange peel garnish. Since we think of Grand Marnier (not a common mixer) as mostly sweet, this recipe does balance sweetness with what is still a very spirit-forward cocktail.

    The Larchmont Cocktail.

    The Larchmont Cocktail.

    But a very, very good cocktail. Both Carolyn and I thought this was a truly well-balanced sip. We did use white Demerara rum and perhaps a few more drops of sugar than Embury would like, but the flavors were delightful. We got orange on the nose from the twist and Grand Marnier, a smooth lime sip with just a touch of heat from the rum and a slight cognac-ish note at the finish. The drink was sour, but had just enough sweet to let the other flavors lead. So if you want to try Embury’s dry style of sour cocktails, we suggest you first try the Larchmont. It softens the transition to come….

    The Larchmont:

    Ingredients:

    • 1 1/2 oz. white rum (El Dorado)
    • 1/2 oz. Grand Marnier
    • 1/2 oz. lime juice
    • Scant 1/4 oz. simple syrup
    • Orange twist, for garnish

    Assemble:

    1. Combine the liquid ingredients in a cocktail shaker with ice. Shake until well-chilled and strain into a chilled cocktail glass or coupé. Twist the orange peel over the glass and add to the cocktail. Serve.
  • Attempting The Zuni Caesar Salad

    Zuni Caesar Salad.

    Zuni Caesar Salad.

    There are few more iconic dishes in the San Francisco Bay Area than the Zuni Caesar Salad. The Caesar Salad may come in and out of style, and heaven knows there are some truly criminal insipid versions out there, but here in Norcal it is still a dish that puts butts in seats at the best restaurants (and the best homes….or farms). And while there may be better versions out there to discover, we make an (almost) annual pilgrimage to Judy Rodger’s Zuni Cafe to get our Caesar Salad….and it is still amazing.

    zuni2zuni3zuni4And a good Caesar Salad is a true masterpiece. Crunch from the romaine and croutons, a rich but acidic dressing and a big dose of umami from anchovy and parmesan combine into true alchemy, a dish that is more than the sum of its parts. But oddly enough, we don’t make many Caesars here at the farm. We weren’t sure why, but we decided to remedy the situation and try to make Caesars at home. And since the Zuni Cafe Cookbook is one of our favorites, we just had to open it up and give the “best” Caesar recipe a try. Easy enough.

    zuni5zuni6zuni7Except that it isn’t really easy at all. The recipe itself is very simple. Judy Rodgers has no tricks that a good home cook wouldn’t know or couldn’t follow. She just gives you solid technique and a list of common ingredients (and the Caesar is made from readily available ingredients). But that is what makes it hard. There is no place to hide. Like many classic dishes (think Caprese Salad) there is no way to mask inferior ingredients or shoddy work. You need to find the best ingredients and then do everything to make them shine. No shortcuts, no appliances, no pre-made, no pre-grated, to pre-peeled, no pre-washed and no making things ahead of time. Just manual labor at the time of service. This salad is real work. But good work.

    zuni10zuni8zuni9So is it worth it? Hell yes. Was ours as good as Zuni’s? Hell no…but damn good, nonetheless. And better than almost any other restaurant version we’ve had. We will make this at home much more often, even with the extra effort. But here are our key takeaways: homemade croutons from good artisan bread are a must (we knew this, but for a Caesar even more important), you need fresh garlic with no bitter green shoots, be very picky with the romaine and take only the best pieces, wash the romaine and then totally dry the leaves (bone dry, seriously, take the extra two minutes and dry those greens), and be very generous with the parmesan….that may be real key.

    zuni11zuni12zuni13And the parmesan really is the key (IMHO). You need good anchovies (salted are better but quality, well-drained oil-packed anchovies will work). You can’t do without good olive oil, vinegar, lemon juice or fresh eggs for the dressing. But in the end, this recipe is a crunchy parmesan delivery service. You must use the real thing, and three ounces of grated Parmigiano-Reggiano is a lot, but the genius of the recipe is that even when a bunch of the parm sticks to the bowl (and it will) there is enough to coat almost every leaf and crouton. So you get alternating bites of bread with parmesan and then romaine with parmesan, or a combination. Think about that….yes, think about that. Uh-huh, we thought so…hard to do better. Continue reading

  • Singapore Shrimp Satay (Satay Udang)

    Singapore Shrimp Satay (Satay Udang)

    Singapore Shrimp Satay (Satay Udang)

    It may be “Labor” Day weekend, but when summer is coming to a close the last thing we want to do is heavy work in the kitchen. Nope, we want quick, easy and tasty dishes for the grill. We want to maximize our outside time with friends, eat good food and perhaps enjoy a few tasty beverages (and whine that real live starts again). But what if we want to go beyond the standard burgers and hot dogs? Enter satay, the Southeast Asian staple of some kind of protein on a stick cooked over a hot fire. Meat..Stick.. Fire….Yumm….More????

    satay

    Mix one of these before you get started.

    Mix one of these before you get started.

    We aren’t sure were we first tried this dish, also called Satay Udang, but it was one of those dishes were we immediately said, “we gotta make this at home”. There are all sorts of shrimp satay, but this version uses a sweet and spicy marinade most often associated with Singapore street food, and if you say “Singapore”and “street food” you will get our immediate culinary attention. (FYI, Singapore created food courts just for street food vendors to control sanitation…..and just maybe tax revenue.)

    satay11satay10satay9The key to this dish is a spicy marinade with aromatics, coconut milk, hot peppers and a surprise element of crushed macadamia nuts. The nuts are ground so they don’t add crunch, but they do lend a surprising richness to the shrimp that augments the coconut milk. The other slight surprise is a four-hour marinating time, as most fish marinades are under an hour, but in this case the shrimp handle the marinade just fine.

    satay8satay7We found this recipe at Saveur but did make a few changes. Firstly the original recipe calls for three Thai Bird chiles. Thai’s run at 50k to 100k Scoville units and are very hot. If you like spice, but don’t love it, we suggest Cayennes at about 30k or Serranos at 15k. These peppers are still spicy and taste great, but won’t blow your head off. (As it is, don’t breathe too deeply or touch your eyes while making the marinade…trust us on this one.) Secondly, we added some extra coconut milk to mellow the spice a bit more, but you can add less if you like.

    satay6satay4Otherwise, putting this dish together is easy. Process the aromatics and peppers, cook them with the coconut milk, chill the mixture, add the shrimp and marinate for 4 hours. Then skewer the shrimp and cook over a hot fire. The cooking mellows the heat of the chiles and what you get are beautiful charred shrimp with a perfect mix of sweet and spice with just a bit of crunch. Good stuff and a nice change of pace for the holiday. Have fun this weekend!

    satay1Singapore Shrimp Satay (Satay Udang):

    (Adapted from Saveur)

    Notes Before You Start:

    • The size and heat of chiles vary. Thai Bird chiles tend to be small, Serranos medium and Cayennes larger. The original recipe wants three Thai chiles, we used one Cayenne and would suggest two Serranos. Err on the side of less spice, you can always add it later.
    • The recipe also calls for Kaffir lime leaves. If you don’t have the leaves, the zest of a few limes can substitute.

    What You Get: Very flavorful shrimp that work as a snack, with rice or in tacos.

    What You Need: A hot fire.

    How Long? About 4 and a half hours, but only about 15 minutes of active time. The only thing you have to do is wait on the marinade. Weekend dish.

    Continue reading