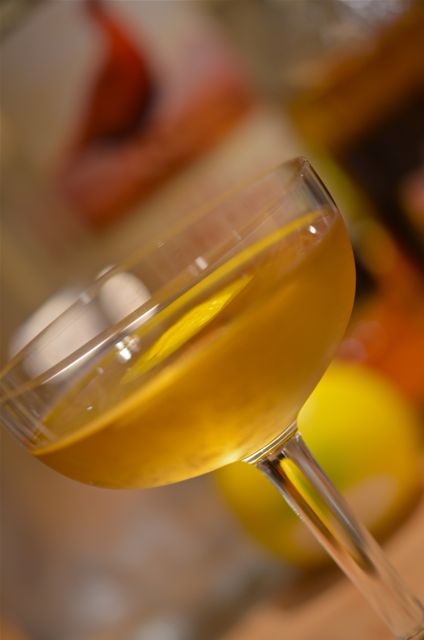
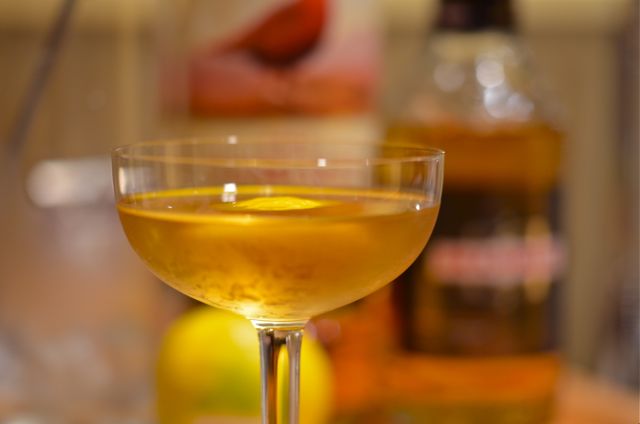
• Weekly Cocktail #38: The Rusty Nail

    nail1

    The Rusty Nail. Up.

    The rain is coming down in sheets, the wind is howling and it’s cold (at least for the Bay Area). Time to light a fire, relax, play some cards or read a good book. But what cocktail to have? This would be a good time for a toddy or old fashioned, maybe a Manhattan. But this is also a perfect time to break out that bottle of Drambuie gathering dust in the back of your bar, grab some blended Scotch and make the almost-forgotten classic, the Rusty Nail.

    nail4

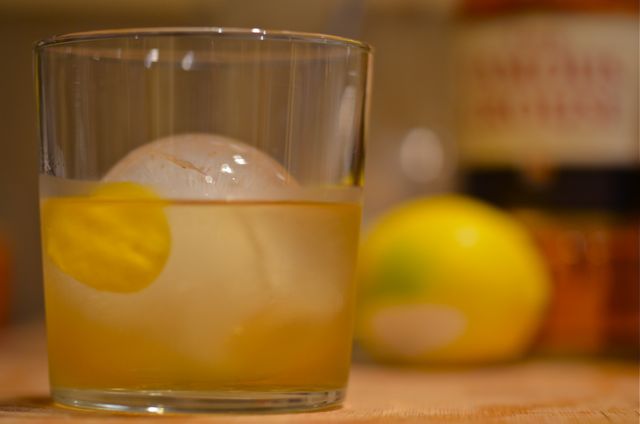
    The Rusty Nail. On the rocks.

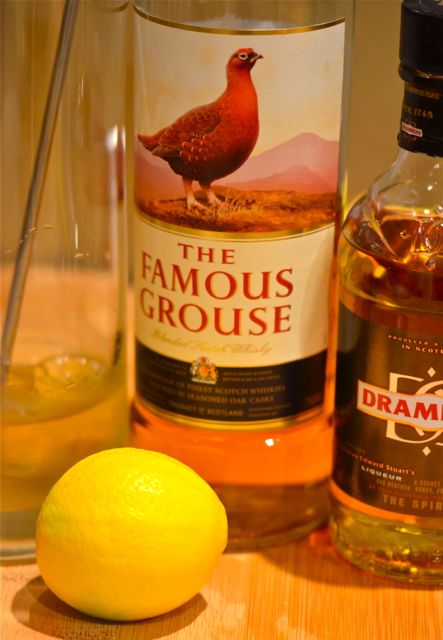
    The Rusty Nail combines blended Scotch, Drambuie and (sometimes) a lemon twist. It it one of the easiest cocktails to make and is served up or on the rocks. The only issue with the Rusty Nail is getting the Drambuie if you don’t already have some hiding away. Drambuie is one of the few Scotch-based liqueurs and it tastes like sweetened Scotch with notes of honey, heather, citrus and spice. Drambuie doesn’t always play well with other spirits, but it does go well with Scotch. The honey and citrus soften the hard, smokey edges of Scotch and make it sippable. To some degree, in the Rusty Nail the Drambuie modifies the Scotch in a similar way to dry vermouth with gin in the Martini, or sweet vermouth with whiskey in a Manhattan. The base spirit still leads the drink, but no longer punches you in the face. Kinder, gentler booze.

    nail5As noted, the Rusty Nail is very easy to make. The only question is the ratios. Some recipes suggest equal portions of blended Scotch and Drambuie, some 2 to 1 and some 4 to 1. We like a 4 to 1, but it will depend on your tastes and the Scotch you use. The cool thing is that you can just add more Scotch or Drambuie as needed. Some recipes also suggest using a single-malt Scotch for the Rusty Nail, and while it’s very good, we will save our single-malts to serve on their own or in toddies. And finally, some recipes use a lemon twist, some don’t. We like a touch of citrus in most drinks and this is no exception. The aroma of the lemon with the Scotch adds an extra dimension.

    nail2And then you have the history of the Rusty Nail. As Drambuie is only about 100 years old, the Rusty Nail is a somewhat recent creation. Drambuie and Scotch cocktails started showing up in the 1930s with various names. Cocktail historian David Wondrich mentions several names for this drink including the “B.I.F.” and, even better, the “Knucklehead”. We kind of like Knucklehead (having sometimes behaved like one). But, not surprisingly, the marketing folks at Drambuie backed the “Rusty Nail” and the name stuck. And the Rusty Nail was a very popular cocktail from the 1950s to the 1970s, but then its popularity faded as darker spirits lost favor.

    nailNowadays the Rusty Nail is having something of a comeback. Craft and classic cocktail bars are serving the Rusty Nail (or variations) and Drambuie started to market itself, and its classic cocktail, to new audiences. Drambuie still isn’t cheap, but if you like whiskey, particularly Scotch, it is worth finding. And if you are looking for a strong, sweet and boozy (but not too boozy) sip, the Rusty Nail is a very good choice and a welcome diversion from old fashioneds and Manhattans.
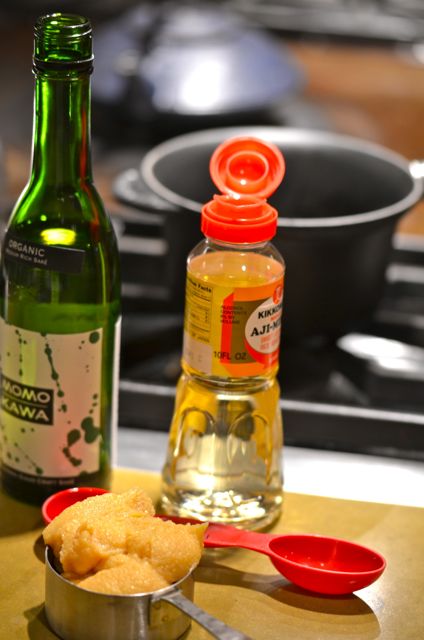
    The Rusty Nail:

    Ingredients:

    • 2 oz. blended Scotch (the Famous Grouse)
    • 1/2 oz. Drambuie
    • Lemon twist

    Assemble:

    1. Add the Scotch and Drambuie to a cocktail glass with some ice. Stir until well chilled and strain into an old fashioned glass with ice, or strain into a chilled cocktail glass or coupé. Twist the lemon peel over the drink, add the peel to the cocktail and serve.
  • Miso Cod Hand Rolls

    Miso Cod Hand Rolls

    One of our favorite all-time restaurant dishes is Nobu Matsuhisa’s Black Cod with Miso, a simple but delectable appetizer that has been knocked off (and with some success) by chefs and home cooks all over the world. If you visit one of the Nobu restaurants, you should order the dish, it is still excellent. The delicate, sweet and flaky cod with a light crust of funky, salty, umami-rich miso is a perfectly balanced bite.

    Matsuhisa’s version of the dish uses black cod and marinates the fish for 2-3 days. And while we know it’s great, it is hard for even food bloggers to plan that far ahead, and we don’t have easy access to black cod. We also needed to beef up the dish a bit to be a main course. But since we have very tasty local rock cod here in Norcal, and we make lots of sushi and/or coconut rice, we adapted a quick version of miso cod (from Food and Wine) for use in rice bowls or hand rolls. And what we get is a very flavorful, easy and healthy meal. The kids even like it (hand rolls are fun).

    And making this dish is very easy, the only variable is time. It only takes a few minutes to mix a marinade of white “shiro” miso, mirin (Japanese cooking wine), sake and sugar. Then you marinate the fish. A half hour marinade time does work, but a full day or overnight is even better. The longer the marinate, the deeper and sweeter the miso flavor. Otherwise, simply make some white rice (we like Japanese medium-grain rice), cut up some nori, dice some veggies like carrots, radish and arugula, saute some shiitake mushrooms, slice up an avocado and break out the pickled ginger, soy sauce and Sriracha.

    We serve the cod two ways. The first is a simple bowl with the rice topped with miso cod, mushrooms, avocado, veggies and slivers of nori. But the real fun is making the hand-rolls.  Just cut the nori sheets into 2×2 inch squares, add in a tablespoon of cooked rice and then layer in the fish and other garnishes. The hand rolls make for a perfect bite. These are great as dinner, but also fun to serve as a snack at parties. But be sure to enjoy a hand roll before you share them, these tend to go fast.

    Continue reading

  • Simple Garden Recipes: Leek And Potato Soup

    Leek and Potato soup.

    Sometimes food recipes are like cocktails. If you get a good recipe, the ratios just work, even if you make variations on the edges. The flavors evolve, but everything stays in balance and tastes great. For cocktails, the “New Orleans Sours” with the 2-1-1 (two parts spirit, one part sweet, one part sour) ratio of the Margarita and Sidecar come to mind. Add some salt, a little sugar and/or some bitters or a new liqueur, the drink will change, but still be good. When we look for savory dishes with “perfect” ratios, there are few better ratios than 4-4-6, the ratio for leek and potato soup. If you want an easy, flavorful, and almost foolproof dish, this is it.

    And, not surprisingly, this recipe comes from Julia Child. We won’t wax poetic (it has been done, and done better than we will ever do), but it is safe to say that Billions (with a capital B) of meals have been, and will be, better because of her work. And many of her recipes, along with the recipes of her sometimes cooking partner Jacques Pepin, remain the standard for simple, classic cooking. For every seemingly overwrought, complex and overly “French” recipe, Julia (and Jacques) have dozens of simple country dishes that just rock. This is one of those recipes. And it’s a good one.

    At the most basic level, all you need is four cups of diced Russet potatoes, four cups of sliced leeks and six cups of salted water. Cook for twenty to thirty minutes and you’re done. And it will be good, and very stick to your ribs satisfying. But maybe you want to use chicken stock, maybe add a touch of cream, maybe garnish with chopped chives, ground black pepper or some smoked paprika? Perhaps you want to purée the soup (we think you should). Maybe you want to serve the soup chilled? Vichyssoise is just a step away. And if you want to sprinkle on some crispy bacon or pancetta, you are a kindred spirit, live long and prosper.

    Hopefully, you get the idea. If you make this soup, follow the general recipe and then adapt it to your tastes. We use chicken stock, purée with an immersion blender, stir in a touch of cream and garnish with what we have.  Do what you like, as you will build from a solid foundation. And one last note, eat this dish and you will be full. This dish isn’t all that fattening, but it is filling. But as winter sets in, and you need a warm and tasty dish (and a nap) at the end of the day, this will do the trick. Thanks Julia.

    Leek and Potato Soup:

    (Adapted from Julia Child)

    Notes Before You Start:

    • Russet or Yukon Gold potatoes will work best for this recipe. Waxy potatoes will not break down as well when boiled or add enough starch to the broth.
    • Garnishes for this dish are endless. If you have left over proteins, just dice and brown them and add to the soup. Then you have a complete dinner.

    What You Get: A very flavorful and filling soup that’s easy to make.

    What You Need: No special equipment required. If you want to purée the soup and immersion blender, food processor or blender will work.

    How Long? About 40 minutes with 10 minutes of active time, mostly peeling and chopping veggies. Anytime dish.

    Ingredients:

    (Serves 6 – 8)

    • 4 cups sliced leeks
    • 4 cups peeled and diced potatoes
    • 6 cups water or chicken stock (add another cup for a thinner consistency)
    • 1 tablespoon salt (if using water, or to taste if using chicken stock)
    • 1/2 cup (or more) heavy cream, sour cream or crème fraîche (optional)
    • Chopped chives, freshly ground black pepper, bacon bits or smoked paprika for garnish (optional)

    Assemble:

    1. Peel and cut the potatoes into 1/4 inch dice. Clean the leeks of all sand and dirt (see photos) and cut into 1/4 inch slices. Add the potatoes and leeks to a large lidded pot and add the water and salt or chicken stock.
    2. Bring the pot to a boil and then lower the heat to a simmer. Cook the soup, partially covered, until the potatoes and leeks are very tender, about 25 – 30 minutes. Taste and adjust for seasoning. Garnish and serve.
    3. Or remove the soup from the heat and  purée the soup with an immersion blender or in a food processor or standing blender. Stir in the cream. Garnish and serve.
  • Weekly Cocktail #37: The Master Cleanse

    The Master Cleanse. And yes, that’s cayenne pepper on the rim.

    Thanksgiving is in the books. It was a lovely holiday and we are grateful for family, friends, food and football. But for many of us, the Friday after Thanksgiving is indeed “Black Friday”. And not because we are braving hordes of shoppers (haven’t these folks heard of the internet?), but because we might still be stuffed and even a bit bleary. So if you partook in a few more bites of turkey or a wee dram too many, how about a cleanse? Even better, how about a Master Cleanse?

    But before you say yes, probably best to tell you what’s in it. The Master Cleanse combines Bourbon (some recipes say applejack), lemon juice, maple syrup, sugar and a pinch of cayenne pepper. And yes, you do get a kick from the cayenne. And while you may or may not feel cleansed of the previous night’s festivities, it will make you forget them, at least for a moment. The Bourbon, maple and lemon combo is quite tasty, and you can make a case that the cayenne adds some pleasant pain zing (whether you want it or not).

    The specifics of the Master Cleanse cocktail recipe are a bit clouded, with the PDT Cocktail Book, Saveur and Joe Beef restaurant in Quebec all having recipes or variations. All recipes combine brown booze, maple, lemon and cayenne. We played around and came up with this version, but the basic recipe allows for varying proportions. We tend to like drinks a bit sweet when we are bleary…so we doubled down and used Bourbon as the spirit with a mix of maple and sugar. Extra sugar also blunts the heat of the pepper. But feel free to experiment.

    While the specifics of the cocktail’s recipe might be hazy, the origins of the name are very clear. The “Master Cleanse” was the name of a lemonade, maple and cayenne diet regimen created by Stanley Burroughs in the 1940’s. Like most (all?) fad diets, it is complete lunacy and has almost no nutritional value. But it does spike what is basically a starvation diet with some sour, sweet and hot notes. Yum. A few years ago Beyoncé’ Knowles used the diet to lose 20 pounds and the “Master Cleanse” basked in many minutes of tabloid adulation before fading back into obscurity. But the reemergence of the diet did give someone the inspiration to create the Master Cleanse cocktail. We will keep the cocktail, Beyoncé can have the diet.

    The Master Cleanse:

    • 2 oz. Bourbon
    • 3/4 oz. fresh lemon juice
    • 1/2 oz. maple syrup
    • 1/2 oz. simple syrup
    • Cayenne pepper
    • Fine sugar (or maple sugar)

    Assemble:

    1. Combine a tablespoon of sugar with a teaspoon of cayenne pepper. Then run the rim of a old-fashioned glass along a lemon wedge. Run the rim of the glass through the sugar and cayenne mixture. Fill the glass halfway with ice and set aside.
    2. Combine the Bourbon, lemon juice, maple and simple syrup in a cocktail shaker with ice. Shake thoroughly, until chilled, and strain into rimmed glass. Serve.
  • Beef Tri-Tip Roast: A Good Meal For A Small Thanksgiving

    Kobe Beef Tri-Tip Roast. A special treat.

    It may seem like sacrilege, but we don’t serve turkey at Thanksgiving. No ham either. Nope, we serve a version of our slow-roasted pork with apples and fall herbs and some kind of roast beef. If we have a big crowd, we roast a whole Tenderloin, but if we have a small crowd, we roast a Tri-Tip. And if we want to splurge, a Kobe Tri-Tip is one of our favorite roasts.

    The Tri-Tip is a triangular 2 to 2 and 1/2 pound cut of beef from the bottom sirloin primal of the cow. It has strong beefy flavor and, if cooked and sliced properly, is quite tender. Out here in California, “Santa Maria Style” Tri-tip, lightly seasoned and slowly cooked over red oak to medium-rare, is a very tasty regional specialty. And if you go into most butcher shops here in Norcal, you will find many custom Tri-Tip preparations and marinades (the black, ugly, but incredibly tasty “Fred Steak” is a local specialty). And as a special treat, most butchers feature a Kobe Tri-Tip. And this is a very special treat.

    While it’s expensive, the Kobe Tri-Tip is a great intro to Kobe beef. Kobe beef is a special type of beef with extra marbling of fat (fat is flavor) and very tender meat. Kobe is expensive, but the Tri-Tip is one of the more affordable cuts and is easy to prepare. The beefy flavor of the Tri-Tip doesn’t need much help, so we simply prepare a quick rub of olive oil, salt and pepper and let the steak marinate for at least four hours or overnight. Then you simply sear the outside of the meat for flavor and then slowly roast until the internal temperature reaches 130 to 135 degrees for medium-rare.

    We use our sous-vide machine for the Kobe Tri-Tip, as we can exactly control the internal temperature (we target 131). We then sear in a cast iron pan, slice and serve. But you can grill Tri-Tip using a two-level fire, or roast in a hot oven. We include cooking instructions for each method. The key to any Tri-Tip recipe is to avoid overcooking, so regardless of method, be sure to pull the roast from the heat before it reaches the target temperature (it will still gain five to ten degrees) and allow the roast to rest at least ten minutes before you slice and serve. And be sure to slice across the grain for a more tender bite. And now you have a very tasty roast that is the perfect size for four to six guests.

    So if you have a small group of guests for Thanksgiving, we have a suggestion. Make all the traditional sides like mashed potatoes, sweet potatoes, creamed spinach, stuffing, cranberries and pie. Pop open a good bottle of wine or cider, maybe make some punch. But save yourself a lot of time and cook up a Tri-Tip. And if you are feeling flush, try out a Kobe Tri-Tip. You won’t have to struggle with a turkey and you will have very happy guests. And if you just can’t bear the thought of beef at Thanksgiving, Tri-Tips are just as good for a casual weekend roast. Tri-Tip makes a good meal any time.

    Beef Tri-Tip Roast:

    Notes Before You Start:

    • Tri-Tip is sometimes called “triangle steak”. If you can’t find Kobe Tri-Tip, ask your butcher, it is a popular cut and usually can be ordered.
    • Tri-Tip does not have a lot of intra-muscular fat and is not a good roast to cook past medium rare. If you need to cook a roast past medium, other cuts will do better.

    What You Get: A quick, easy, tasty and tender beef roast.

    What You Need: No special equipment required. But a digital thermometer, or meat thermometer reduces the risk of overcooking. We cook this roast sous-vide, but the grill or oven also work well.

    How Long? If grilling or oven-roasting this dish takes about 20-30 minutes. Sous-vide cooking will take 4-8 hours and then 2-3 minutes of searing the meat. The beef benefits from an overnight marinade.

    Ingredients:

    (Serves 4 – 6)

    • 2 tablespoons olive oil
    • 1 tablespoon kosher salt
    • 1 teaspoon freshly ground black pepper
    • 1, 2 and 1/2 pound Tri-Tip roast, trimmed (Kobe, if you like)
    • Vegetable oil or bacon fat, for searing (if cooking sous-vide)

    Assemble:

    1. Combine the oil, salt and pepper in a small bowl and mix well. Dry off the Tri-Tip and coat with the oil mixture. Put the roast in a container or plastic bag and then place in the fridge for 4 -12 hours.
    2. If charcoal grilling: Build a two-level fire. Sear the roast for 2-3 minutes on each side, on the hot side of the grill. Then move the roast to the cooler side of the grill. Cover the grill and cook the roast, turning occasionally, until you reach an internal temperature of 125-130 degrees, about 20 minutes. Remove the roast from the heat and let it rest at least 10 minutes. Slice and serve.
    3. If gas grilling: Set up the grill for high heat. Sear the roast for 2-3 minutes on each side. Then move the heat to low, cover the grill and cook the roast, turning occasionally, until you reach an internal temperature of 125-130 degrees, about 20 minutes. Remove the roast from the heat and let it rest at least 10 minutes. Slice and serve.
    4. If oven roasting: Preheat the oven to 425. Place the roast in a roasting pan (with a rack, if possible) and put the pan in the oven. Cook for 5 minutes and then lower the heat to 350. Cook cook the roast, turning occasionally, until you reach an internal temperature of 125-130 degrees, about 20 – 30 minutes. Remove the roast from the heat and let it rest at least 10 minutes. Slice and serve.
    5. If using sous-vide: Set the sous-vide temperature to 131 degrees (or your desired temperature). Remove excess oil from the roast and seal in a vacuum bag. Cook sous-vide for at least 4 hours, 6 – 8 is preferred. When the roast is done, heat vegetable oil or bacon fat in a skillet over very high heat. Sear the roast 1 – 2 minutes on each side, or until well browned. Slice and serve.
  • Easy, “Perfect” Mashed Potatoes

    Easy, Perfect Mashed Potatoes.

    Ah, the “Mashed Potato Martini”, the symbol of swanky 1990’s catering. A cocktail glass brimming with buttery mashed potatoes and topped with your choice of butter, sour cream, bacon, cheddar cheese, chives and parsley. A pleasant, if somewhat excessive, relic of the dot-com era. But just as the excesses of dot-com left some valuable companies and technologies in their wake, the mashed potato martini left us with a valuable legacy, we got serious about making “perfect” mashed potatoes.

    And by “perfect” we mean, tasty, easy and predictable. And a recipe that easily scales for large events. After a few years of intermittent experiments we developed this recipe / process and never looked back. The basics are simple, we use Yukon Gold potatoes and plenty of cream, butter and salt. And we have just a few techniques that make a big difference in texture. And, of course, we add a plenty of extra butter, bacon, cheese, etc. We just don’t believe in “light” or “healthy” mashers. We save that for kale dishes.

    As for the ingredients, the main difference is using Yukon Gold instead of starchy Russet potatoes. The Yukons are a mix between waxy and starchy potatoes, and they have an overt “buttery” flavor. The big advantage of the Yukons is that they don’t dry out like Russets. So while you do need cream and butter, the Yukons add their own moisture without being watery. You get a creamy texture and pronounced potato flavor to match the dairy and salt. Good stuff.

    As for the key techniques, they are also very easy, but important. Firstly, after you drain the potatoes, put them back in the hot pot and mash with the warm dairy. The hot pot dries out any extra water (you don’t want watery mashers). Secondly, only mash just enough with the masher and then move to folding with a spoon. Too much mashing makes for a gluey texture, better to have a few lumps. And finally, have extra butter and milk ready to mix into the mashers if they seem stiff or dry. And feel free to keep adding butter…hard to go wrong. Then adjust seasoning, serve with more butter on the side and you’re done. All in less than 30 minutes. Perfect.

    And if you want to be “fancy” there are a few other steps you can take. If you just hate lumps, you can run the mashers through a fine mesh strainer to get a very smooth consistency (if you do this, you may as well add as much butter as you can- like a mousseline). And lastly, if you want to pull out the martini glasses and add a bunch of garnishes you may get a few extra smiles at the table. A slightly ridiculous, but also delicious, dish for the “holidaze”.

    Easy, Perfect Mashed Potatoes

    Notes Before You Start:

    • Yukon Gold potatoes are widely available. Use the largest Yukons you can to save time on peeling.
    • This recipe is for 4 – 6 as a side, but scales easily for larger groups.

    What You Get: Like we said, perfect mashed potatoes.

    What You Need: A potato masher, or a ricer. But the masher is the best tool for this recipe.

    How Long? About 30 minutes, with 10 minutes of active time. This is an anytime dish. Continue reading