• A Few Tips On Cooking For Thanksgiving

    Rule #1: Think happy thoughts...

    Rule #1: Think happy thoughts…and be grateful.

    We are not much on “how-to” or “5 keys to the best Thanksgiving x…” posts here at the farm, but with the holidays coming (including the once in a lifetime bonus holiday of “Thanksgivvukah”) we figured we should share some thoughts on how to make the most of your Thanksgiving cooking. Here is our take on the important stuff:

    Before the holiday:

    • Don’t worry about the specific dishes and recipes you are going to cook until you have a guest count. Some recipes work with small crowds, some with big crowds. Cook dishes that make sense for the size of the group you have (and your budget).
    • Once you have the guest count, decide what you want to cook and what oven and stove top space you have. Make sure you can cook the dishes you want with the appliances and tools you have. Then when guests ask “what can I bring?” you will have a good idea of what else you need, based on the resources you have.
    • Remember that your grill can be a useful tool if you are out of stovetop burners or ovens.
    satay7

    Remember your grill is an extra oven or burner.

    • When a guest asks “what can I bring?”, be very specific and ask for something you know the guest can bring and/or make. At first, you may come off a bit fussy or demanding, but when a guest brings the perfect dish, pie, bottle of wine, etc. that fits with the meal, they will feel great- and so will you and the rest of your guests. Everyone likes to be a hero. Don’t be afraid to ask guests to bring what will be best with the meal.
    • Desserts are often best made day ahead or earlier in the day to save you time and space. Most pies are better at room temperature anyway. Cakes need to cool before frosting. All of this is best done ahead of time.
    pound7

    Make desserts ahead of time to save kitchen space….and sanity.

    What to cook on Thanksgiving?

    • Thanksgiving is about giving thanks for all we have (and regardless of the craziness of everyday life, most of us have a lot to be grateful for). The meal is not about Norman Rockwell paintings or Martha Stewart magazine spreads. Thanksgiving should be about serving your best dishes to the people you love. Beauty is only skin deep, makes sure the food tastes good!
    • With that in mind, there is nothing wrong with serving something other than turkey. If you make great beef, chicken, pork (or even vegetarian) dishes for a crowd, then serve them. Serve them with pride. How about a small turkey and something else? There will always be the high-maintenance jerk  someone who will talk about “grandma’s this” or “traditional” that. They can cook next year…but usually they won’t. Forget ’em (but with a smile, of course) and serve what you know tastes good. Tasty food wins over everything. Always.

    But what if I want to serve turkey?

    If you plan to serve turkey and actually want it to taste good and be moist, here are a few pointers that will make a big difference:

    • Deep-fried turkeys are great, but proceed with caution. Let’s face it, most of us drink a lot bit during the holidays. Booze, fire and hot oil are a very bad combination (particularly if you have kids running around). If you want a deep-fried turkey, hire a pro to do it. There are plenty of people who can do it for you. Seriously. DIY is great, but with hot oil? C’mon….
    • Your turkey will be better if you salt / brine it. You can use a water-based wet brine, or simply salt the turkey with what is called a “dry brine”. Either way, the pre-salting makes for moister, more flavorful meat (trust us, the chemistry is sound, even if it seems counterintuitive). There are plenty of good recipes for brined turkeys, but here is a good guide to the pros and cons of dry or wet brining your turkey.
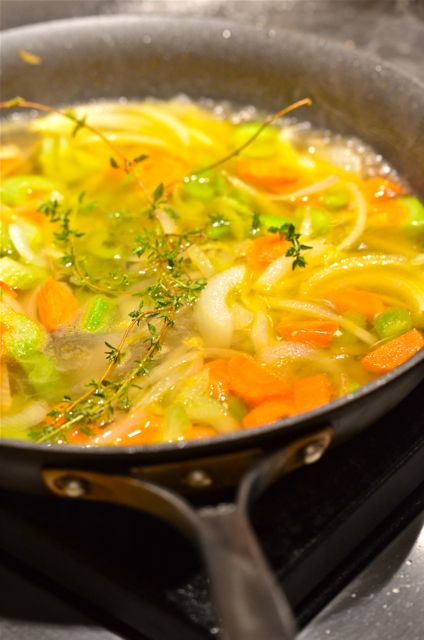
    • One of the only drawbacks to brined turkeys is that you can’t use the drippings for gravy, as they will be too salty. We suggest you make a gravy using commercial chicken stock (usually it is your best option, that may sound heretical, but it is often true) or ask your butcher for turkey stock (they may have some) or extra turkey parts (like the backbone) for stock.
    • The best way to cook poultry is to do it in pieces. White meat is done at a lower internal temperature than dark meat and there is no magical way to change that. The easiest way to get perfect white and dark meat is cook the breasts and legs separately and then present them together (even Julia Child said this was the way to go). If you present the turkey well, no one will even notice. Actually, your guests will notice…that you served the best turkey they ever had.
    ChickenIng4

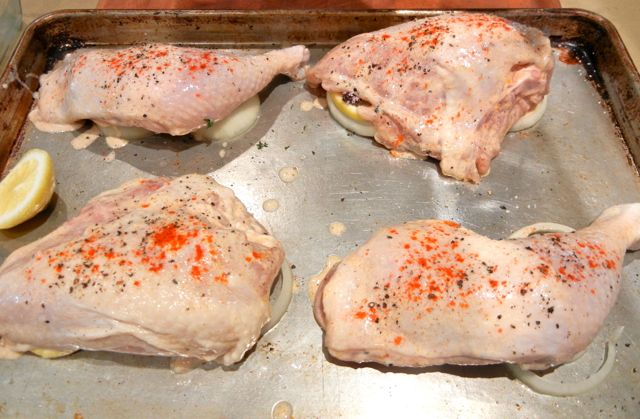
    Cook poultry in pieces. It works.

    • If you are cooking the turkey in pieces, you need to track internal temperature for best results. You need a quick read (cheap, like $10), or even better, a digital thermometer (over $50) to know the internal temperature of your meat. No excuses. And those “pop-up” thermometers in the turkey simply don’t work…unless you like to eat bone-dry turkey.
    • Rethink everything you know about the desired internal temperature of poultry. The “safe” 160-165 F degree internal temperature we hear about for poultry is based on the idea that you will eat the turkey at the very moment it comes out of the oven. Who does that? Nobody. At 165 F all bacteria are dead immediately. But turkey white meat starts to dry out above 150 F. This seems like an insurmountable problem, but if you cook the turkey breast to 145-150 F and let it rest for 20 minutes, the heat will increase to 160 while the turkey rests and the bacteria will be killed by longer exposure to temperature. You get a safe, but moist, turkey breast. (The government actually knows this, but figures we are all too stupid to understand this nuance). If you want more detail and a good recipe, see here and for the chemistry, see here.
    • Dark meat is very hard to overcook. Shoot for an internal temperature of at least 180 degrees. If you go a bit over, it’s no big deal. There is so much connective tissue in the dark meat that it will stay moist at higher temperatures. We suggest you simply cook the dark meat to the desired temperature while the white meat rests. Easy.
    • Don’t cook stuffing in the turkey. Just don’t. If you want to worry about food safety, cooking stuffing inside the bird is the biggest risk you will have.
    • You can deep-fry, roast or smoke your turkey at many different cooking temperatures. Many methods / recipes work, assuming you target the right internal temperature of your meat. Some cooking methods will yield more attractive, crisper skin than others. You can always crisp the skin of your turkey with a quick blast in a high-temperature (500 F) oven. If you crisp the skin for less than 5-10 minutes, it will have minimal impact on internal temperature but give you a golden brown skin.
    chix2

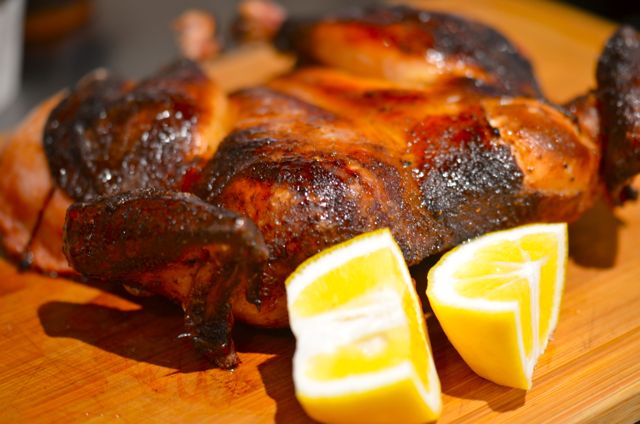
    Crisp the skin for a few minutes in a hot oven.

    Kitchen tips:

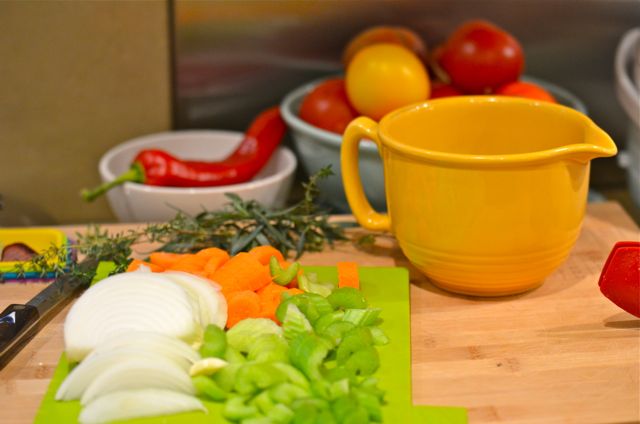
    • You are (most likely) not a chef, don’t try to act or look like one. Chefs do all that flashy and speedy chopping because they are used to prepping for hundreds of guests. For them, speed matters (and is a bit of a macho thing). For you, it is best to avoid slicing your fingers off. Even if you have 30 guests, the amount of prep you have to do is probably manageable. Take your time chopping and slicing. Even if you go slowly it will only cost you an extra 5-10 minutes. Take your time, keep your fingers intact and avoid a trip to the ER.
    • Plan on the right time and method for thawing your meat. If you have a fresh turkey or roast, that is great. But many of us will have frozen meat. Big frozen turkeys take a lot of time to thaw, and if you do it in the fridge (and you should), it will take days. Here is a guideThere is no better way to screw up your cooking for Thanksgiving than to forget to thaw the turkey or roast. Make sure you have a plan to thaw your bird.

    Continue reading

  • Weekly Cocktail #60: The Stone 75

    The Stone 75 Cocktail.

    The Stone 75 Cocktail.

    Ah, cocktails. Just when you think you’ve had enough….they pull you back in. And in this case, “had enough” meant that we recently hosted Mixology Monday and had seen our fill of cocktails and photos. We were a bit tired. Time for some tea, maybe a sip of wine, new kegs on tap (an IPA and a crisp golden ale), and perhaps some hard cider to celebrate the season. Cider? Hmm….

    stoneAnd this is what happens once you start mixing drinks and catch the bug. We got a few different bottles of hard cider to play with and suddenly the gears started grinding turning and we were mixing away. This time the inspiration came from a bit of internet research into different styles of cider. While looking at dry vs. sweet cider we saw a recipe for the Stone Fence, one of America’s oldest cocktails and perhaps our original highball.

    stone1stone2The Stone Fence is the simple combination of a big glass of hard cider and a shot of rum, applejack or whiskey. This drink is literally hundreds of years old and the variety of hard liquor simply reflects what was available at any time or different regions. Applejack in New Jersey or rum in Massachusetts, gave way (somewhat) to whiskey, but all still work. At some point, most people added ice to the mix and we get this “proto-highball”. A good sip, particularly if feeling a bit lazy. But as you may have guessed, the big issue is that this is a strong drink. We will forgo the “fell face-first into a Stone Fence” jokes…but you get the idea.

    stone7We decided to play with the basic recipe and craft something with a bit less booze (but just a bit) and a slightly more elegant presentation. We also had some old-school sugar to play with (a piloncillo of Mexican sugar that would be similar to colonial-era sugar) and decided to include it in the cocktail. As for inspiration, we looked to two of our favorite sparklers, the citrusy French 75 and the bitters-heavy Seelbach.

    stone3After some very pleasant experimentation, we came up with the Stone 75. The Stone 75 combines muddled lemon peel and sugar with lemon juice, Cointreau, Jamaican rum, applejack, tiki bitters (Angostura also work) and dry hard cider. Served in a coupé or flute and topped with a lemon twist, this is a very pretty cocktail.

    stone4stone6 Continue reading

  • Mixology Monday LXXVIII Roundup: Intercontinental

    Time of the Saison cocktail.

    Time of the Saison cocktail.

    Another Mixology Monday has come and gone, so now it is time for the roundup. Our theme was “Intercontinental” and the goal was to mix a cocktail, or cocktails, that have “ingredients” from at least three but up to seven continents. And, as we mentioned, the definition of  “ingredient” was pretty broad, so we hoped to see many cocktails that spanned the globe….including Antarctica.

    mxmologoSo how did everyone do?  Very, very well, IMHO. The cocktails, photos and the stories were great. We actually had many of the ingredients (should we be embarrassed about that?) and mixed a number of the drinks. Very tasty. And just as important, an excuse (motivation?) to try something new. Whenever we feel we may be getting into a slight cocktail “rut”, Mixology Monday snaps us out of it.

    Thanks again to everyone for participating and to Fred Yarm at Cocktail Virgin Slut for keeping MxMo going. Here is the roundup (in no particular order):

    Feu-de-vie, one of our favorite booze blogs, covers six continents with the Giganta, a coffee-pineapple tiki-ish concoction with homemade Coffee-Macadamia Orgeat. Nice. We want some of that…

    Giganta cocktail.

    Giganta cocktail.

    Next we get the Vegan Pisco Sour from Elana at Stir and Strain. She has lovely creations and her photos are some of the best we have seen. For this cocktail, not only do we get four continents, but some cool info on using beer as a substitute for egg whites in “foamy” cocktails. For vegans, good stuff. For us, a tasty drink. Everyone wins.

    Vegan Pisco Sour cocktail.

    Vegan Pisco Sour cocktail.

    Amarula, the “Bailey’s of Africa” makes its first (but not its only) MxMo appearance in Swizzlestick’s Life is Beautiful cocktail. Lychee liqueur made it in as well. A truly global cocktail that hits six continents. Well done.

    Life is Beautiful cocktail.

    Life is Beautiful cocktail.

    The good folks at Booze Nerds take advantage of a good name/story and global ingredients to cover seven continents with the Amundsen (nice historical reference guys!). More importantly we get a very creative drink with spirits, amaro, bitters, spice, a tea reduction / syrup and a port wine float. Gold Star.

    Amundsen cocktail.

    Amundsen cocktail.

    The Straight Up, gives us another drink using Australian port and narrative license to cover seven continents with the ….and Antarctica. Again, we also see some tea and amaro in play for this beautiful aperitif-style cocktail. We certainly are intrigued with the mix of bitter, tannic, smokey and herbal ingredients. Gold Star.

    ...and Antarctica cocktail.

    …and Antarctica cocktail.

    Our Bay Area neighbors and frequent travelers BarFlySF, take us to five continents and then a few layers of hell as a bonus…seriously. They give us Dante’s Divinia and Dante’s Divinia Down Under, riffs on the Dante’s Paradise cocktail they discovered at Longman and Eagle’s in Chicago. And with some Habanero shrub involved- there will be some fire.

    Dante's Divinia.

    Dante’s Divinia cocktail.

    Out in Tennessee, Sass and Gin goes a slightly more traditional route with the Madison’s Revenge. This Manhattan variant shows that you can get to five or six continents quicker than you think. A little tuning of sweetener, spice or garnish and you have a global cocktail. Good work.

    Madison's Revenge cocktail.

    Madison’s Revenge cocktail.

    Our fearless leader Fred Yarm of Cocktail Virgin Slut pulls out a bottle of Van Der Hum, an African tangerine and spice liqueur, for a very spirituous, old-time cocktail the Daiqurbon. We expected to see a bit more Van Der Hum this MxMo, but since we couldn’t find any here in Norcal, we are glad somebody found some.

    Daiqurbon cocktail.

    Daiqurbon cocktail.

    Continue reading

  • (Mostly) Easy Minestrone

    Easy Minestrone.

    Easy Minestrone.

    mine1mine2Seeing as how we grow a lot of our own produce we should know better than to simply judge produce on its appearance. In fact, often the best tasting fruits and veggies are downright ugly, and certainly not the stuff you would see on supermarket shelves. But both in our garden and at the farmers market we are still suckers for a pretty face. Happily, these days you can get both good-looking and good tasting produce. Such is the case with some colorful red carrots we bought at the farmers market. Beautiful, crunchy and sweet…we got a bunch.

    mine4So here we are back with our common challenge, “what do we do with all these carrots?” Well, with carrots we either eat them raw with a pinch of salt (never gets old), or we are making soup. Seeing as how salted carrots doesn’t make up much of a blog post, we went for soup. If we had any pork stock or ham hocks we would make “holiday hangover soup” or a garbure, but we don’t. We did have chicken stock and some left over pasta. Yup…time for Minestrone.

    mine5mine6We won’t get into the history of Minestrone and we aren’t even sure there is a truly “traditional” recipe. But if you have some veggies, chicken or vegetable stock and some pasta, you can cobble together a decent Minestrone. Add a little cured pork, maybe some white beans, fresh herbs and simmer with a parmesan rind and you get something that gets pretty darn good. And feeds an army.

    mine7mine8The recipe we use is a riff on a riff on a riff of an Ina Garten “Winter Minestrone” recipe, which itself is a riff on a very common formula. We change the recipe quite a bit, but we do use the same slate of winter vegetables, particularly some butternut squash that adds very nice sweet flavor to the soup along with a bit of spinach at the end that adds color and welcome bitter notes. We also use more cured pork (of course) dried beans we soak (yes, it is worth it), fresh herbs and the parmesan rind. Lots of flavor and not a lot of work other than chopping veggies.

    mine9What you do need here is time. Chopping the veggies takes a while. Soaking beans (either a long or quick soak) requires some planning and advance work. And cooking the soup takes at least an hour. Basically this is a weekend dish. The good news is that, as is often the case with this type of soup, the Minestrone is better the next day. So you can make a batch on Sunday and serve it for dinner and then have the Minestrone as a very tasty lunch or light supper later in the week. A pretty good deal and a very good way to use of some of those lovely veggies you get at the market…or from your garden.

    mine10Easy Minestrone:

    (Adapted, somewhat, from Ina Garten)

    Notes before you start:

    • You can use canned white beans but we heavily suggest rehydrating and cooking dried white beans. The simply taste better.
    • You can soak beans overnight (better) or quick soak the beans- just cover the beans with water, bring the water almost to a boil and then turn off the heat. Let the beans steep, covered, for an hour and then cook.

    What You Get: Very tasty and healthy soup that will last for a few days.

    What You Need: No special equipment required, just be ready to chop some veggies.

    How Long? At least a few hours, mostly inactive other than chopping. Budget time to soak the beans.

    Ingredients:

    (Makes 8 big servings)

    • 1 pound dried white or cannellini beans (soaked overnight or quick-soaked)
    • Olive oil
    • 6 ounces pancetta or bacon, diced
    • 1 1/2 cups yellow onions, diced (diced= roughly 1/2 inch pieces)
    • 2 cups carrots, peeled and diced
    • 2 cups celery, diced
    • 2 1/2 cups butternut squash, peeled and diced
    • 1 1/2 tablespoons minced garlic (about 3 large cloves)
    • 2 teaspoons chopped fresh thyme leaves
    • 1 teaspoon chopped fresh marjoram or oregano (optional)
    • 1 (26-ounce) can or box diced tomatoes
    • 1 pinch red pepper flakes (optional)
    • 1 parmesan rind (optional)
    • 6 to 8 cups chicken stock
    • 1 bay leaf
    • Salt and freshly ground black pepper
    • 2 cups cooked small pasta
    • 8 to 10 ounces fresh baby spinach leaves
    • Parmesan and/or Romano cheese for garnish
    • Italian parsley, for garnish

    Continue reading